The Modelers Thread

Re: The Modelers Thread
These models have hulls 8-12” long, so not too small. They are waterline profile kits, so the bottom is flat. Maybe I’ll give it a try...can’t hurt.
-
Rufus T. Firefly
- Posts: 41330
- Joined: Wed May 16, 2007 6:52 am
- Location: Departed from this forum
Re: The Modelers Thread
healey36 wrote:These models have hulls 8-12” long, so not too small. They are waterline profile kits, so the bottom is flat. Maybe I’ll give it a try...can’t hurt.
It's a firm maybe on the hurt. Paint will suffer as might all joints as everything will flex. Need to block everything to where it should be.....
Conservatism: The intense fear that somewhere, somehow, someone you think is inferior is being treated as your equal.
Re: The Modelers Thread
Started the assembly process:

One of the annoying things about my methods and some of these paper kits is that you are left with exposed edges on the matt board at the corners. A few of the kits provide an overlap at the edge that will wrap over the exposed edge of the board, but most do not. Carstens did not in his TT "cutout" projects. This leaves you having to cut thin strips from reprints to use to cover the corners. It's a bit fiddly, trying to cement it over a 90-degree bend while keeping the pattern aligned. If you're lucky, it's not too obvious when you're done.
One of the annoying things about my methods and some of these paper kits is that you are left with exposed edges on the matt board at the corners. A few of the kits provide an overlap at the edge that will wrap over the exposed edge of the board, but most do not. Carstens did not in his TT "cutout" projects. This leaves you having to cut thin strips from reprints to use to cover the corners. It's a bit fiddly, trying to cement it over a 90-degree bend while keeping the pattern aligned. If you're lucky, it's not too obvious when you're done.
-
Rufus T. Firefly
- Posts: 41330
- Joined: Wed May 16, 2007 6:52 am
- Location: Departed from this forum
Re: The Modelers Thread
Those 2 look rather good to me!
Conservatism: The intense fear that somewhere, somehow, someone you think is inferior is being treated as your equal.
Re: The Modelers Thread
Can you color the exposed edges with an appropriately colored Sharpie marker?
Re: The Modelers Thread
RBH29 wrote:Can you color the exposed edges with an appropriately colored Sharpie marker?
I've done that with cardstock, but haven't had good success with matt board. I used water-based commercial artist markers that seem to work a bit better than a Sharpie, plus the variety of colors is a more extensive. The Clever Model instructions recommends a gray colored marker for darkening/blending the edges.
A better alternative might be to use matt board that has a colored core. My experience, though, regardless of what method one uses, you still end up with a straight exposed edge on the corner that can look weird, so I typically cover the edge with paper.
-
Rufus T. Firefly
- Posts: 41330
- Joined: Wed May 16, 2007 6:52 am
- Location: Departed from this forum
Re: The Modelers Thread
Fast forward....
Last edited by Rufus T. Firefly on Wed Jul 05, 2023 8:00 pm, edited 1 time in total.
Conservatism: The intense fear that somewhere, somehow, someone you think is inferior is being treated as your equal.
Re: The Modelers Thread
Very nice. One wonders why the wide overlap on the top bit of each tank, but presumably there's a good reason. Maybe it serves as a "platform" for the guy loading the tank. A very interesting car, for sure. The first thing that comes to mind is it's no wonder there's no oysters left in the Chesapeake 
Starting to knock down these signal/switch towers. Here's Carstens' design from the magazine with a few minor changes:

A few MS Paint edits to the original scan, primarily blackened windows and the addition of a few shades. The staircase was amended to eliminate the mid-level landing and the 90-degree turn to the left. The scan of the roof bits was missing quite a bit of color/detail, so I just built it to Carstens' design profile, then spray-painted it with some multicolored/textured brown spray paint I found in the basement. I was going to give it a top-coat of flat black, but decided I kinda liked the brown as is. I plan to eventually apply medium gray ballast to the base.
Now, where to put it.
Starting to knock down these signal/switch towers. Here's Carstens' design from the magazine with a few minor changes:
A few MS Paint edits to the original scan, primarily blackened windows and the addition of a few shades. The staircase was amended to eliminate the mid-level landing and the 90-degree turn to the left. The scan of the roof bits was missing quite a bit of color/detail, so I just built it to Carstens' design profile, then spray-painted it with some multicolored/textured brown spray paint I found in the basement. I was going to give it a top-coat of flat black, but decided I kinda liked the brown as is. I plan to eventually apply medium gray ballast to the base.
Now, where to put it.
Re: The Modelers Thread
RBH29 wrote:I've yet to built the Clever Models crossover tower and I was looking for tips on how to handle the stairs. Those tiny pieces are intimidating. I'm currently working on one of their simpler models and having an issue with warpage. I can imagine the warping problems with the stair pieces,
I've read about ways to get crisp cuts on inside corners. One is to make a pin hole in the corner first and then you can feel when to stop cutting. Another is to slightly over cut the corner but I don't think that would work well with window mullions since they're so thin. There's also a technique of applying CA glue to the cardstock before cutting. Apparently it then behaves somewhat like plastic, reducing the tendency of getting "fuzzy" corners. I haven't actually tried any of these techniques so can't comment on how well they work.
Richard
The steps don't necessarily scare me, it's the vertical supports that I can't get to work. I think I might try building them up a bit from multilayers of cardstock. Using a really sharp Xacto #2, I think I might be able to then cut them out without the curling I've been experiencing.
I will say, there's no chance in Hades I'm cutting out window frames/sills/mullions or door frames and hinges as specified. The second version is of a board-n-batten design, where the battens need to be cut out and applied separately. It would make for an incredible finish, just no skills close to pulling that off.
Nope, the basic print works for me.
-
Rufus T. Firefly
- Posts: 41330
- Joined: Wed May 16, 2007 6:52 am
- Location: Departed from this forum
Re: The Modelers Thread
healey36 wrote:Very nice. One wonders why the wide overlap on the top bit of each tank.......
The weather.....particularly when it's raining herring.
Conservatism: The intense fear that somewhere, somehow, someone you think is inferior is being treated as your equal.
Re: The Modelers Thread
healey36 wrote:Very nice. One wonders why the wide overlap on the top bit of each tank, but presumably there's a good reason. Maybe it serves as a "platform" for the guy loading the tank. A very interesting car, for sure. The first thing that comes to mind is it's no wonder there's no oysters left in the Chesapeake
Starting to knock down these signal/switch towers. Here's Carstens' design from the magazine with a few minor changes:
A few MS Paint edits to the original scan, primarily blackened windows and the addition of a few shades. The staircase was amended to eliminate the mid-level landing and the 90-degree turn to the left. The scan of the roof bits was missing quite a bit of color/detail, so I just built it to Carstens' design profile, then spray-painted it with some multicolored/textured brown spray paint I found in the basement. I was going to give it a top-coat of flat black, but decided I kinda liked the brown as is. I plan to eventually apply medium gray ballast to the base.
Now, where to put it.
That turned out nice. I’d like to see that at dusk with some lighting
Re: The Modelers Thread
It would be fun, maybe, to make a version that could handle interior lighting. It probably wouldn't be that tough to cut the windows out, as the frame/mullion detail here isn't too complex, and a bit of clear acetate behind for glazing. The big problem, as I see it, is that once you open it up for an interior view, you have to do something with that interior to make it look right (not just a bunch of multicolored snippets of paper cemented inside).
Here's another tower I built, this from Howard Lamey's plans over on his Tribute to Tinplate site:

He used the prewar Hornby tower as his starting point for the design (photo courtesy of Howard's site):
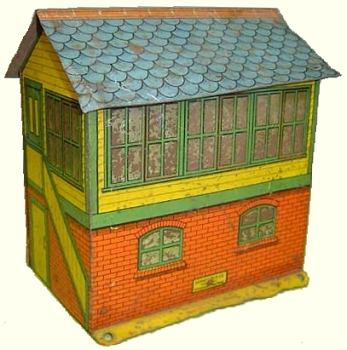
The prewar version had the staircase simply printed in two-dimensional fashion on one end, and the windows were printed. Sarge flipped me a few shots of his postwar version, this having stamped-out windows and an actual three-dimensional staircase on the one end. I decided to use Howard's plan but, with his permission, alter it to black out the windows and add a full-on staircase at one end. Using MS Paint, I made those changes. I had thought about cutting out the windows and providing it a full interior, including the bank of levers that comprise the controls, but cutting out Howard's version of the windows was too much (read I got too lazy). Sarge's postwar version has a simpler window design, so maybe I'll make another one at some point using a version of the postwar windows and then put an interior in it (along with a light).
The ultimate version of the Hornby tower was the full-blown working tower, complete with switch controls:

The back of the tower opened to provide access to the levers, somehow connected to multiple sets of points via connecting linkages. This version also included a nice chimney, along with a few fire buckets in the lithography.
This simple version I built is definitely slightly bigger than 1/48-scale. Effing around with stuff in MS Paint, one can easily and unknowingly enlarge or shrink the design in the process of manipulating the graphics and printing. I've had this problem on a number of projects, especially where you're working from a pdf file converted to a jpeg format. Replicating colors can also be a pain, but I think that's almost entirely a function of the HP printer I'm using.
Meanwhile, I have two or three other tower versions I want to work on, a couple of which I can't reasonably include on "The Modelers Thread"
Here's another tower I built, this from Howard Lamey's plans over on his Tribute to Tinplate site:
He used the prewar Hornby tower as his starting point for the design (photo courtesy of Howard's site):
The prewar version had the staircase simply printed in two-dimensional fashion on one end, and the windows were printed. Sarge flipped me a few shots of his postwar version, this having stamped-out windows and an actual three-dimensional staircase on the one end. I decided to use Howard's plan but, with his permission, alter it to black out the windows and add a full-on staircase at one end. Using MS Paint, I made those changes. I had thought about cutting out the windows and providing it a full interior, including the bank of levers that comprise the controls, but cutting out Howard's version of the windows was too much (read I got too lazy). Sarge's postwar version has a simpler window design, so maybe I'll make another one at some point using a version of the postwar windows and then put an interior in it (along with a light).
The ultimate version of the Hornby tower was the full-blown working tower, complete with switch controls:
The back of the tower opened to provide access to the levers, somehow connected to multiple sets of points via connecting linkages. This version also included a nice chimney, along with a few fire buckets in the lithography.
This simple version I built is definitely slightly bigger than 1/48-scale. Effing around with stuff in MS Paint, one can easily and unknowingly enlarge or shrink the design in the process of manipulating the graphics and printing. I've had this problem on a number of projects, especially where you're working from a pdf file converted to a jpeg format. Replicating colors can also be a pain, but I think that's almost entirely a function of the HP printer I'm using.
Meanwhile, I have two or three other tower versions I want to work on, a couple of which I can't reasonably include on "The Modelers Thread"

Re: The Modelers Thread
healey36 wrote:It would be fun, maybe, to make a version that could handle interior lighting. It probably wouldn't be that tough to cut the windows out, as the frame/mullion detail here isn't too complex, and a bit of clear acetate behind for glazing. The big problem, as I see it, is that once you open it up for an interior view, you have to do something with that interior to make it look right (not just a bunch of multicolored snippets of paper cemented inside).
Here's another tower I built, this from Howard Lamey's plans over on his Tribute to Tinplate site:
He used the prewar Hornby tower as his starting point for the design (photo courtesy of Howard's site):
The prewar version had the staircase simply printed in two-dimensional fashion on one end, and the windows were printed. Sarge flipped me a few shots of his postwar version, this having stamped-out windows and an actual three-dimensional staircase on the one end. I decided to use Howard's plan but, with his permission, alter it to black out the windows and add a full-on staircase at one end. Using MS Paint, I made those changes. I had thought about cutting out the windows and providing it a full interior, including the bank of levers that comprise the controls, but cutting out Howard's version of the windows was too much (read I got too lazy). Sarge's postwar version has a simpler window design, so maybe I'll make another one at some point using a version of the postwar windows and then put an interior in it (along with a light).
The ultimate version of the Hornby tower was the full-blown working tower, complete with switch controls:
The back of the tower opened to provide access to the levers, somehow connected to multiple sets of points via connecting linkages. This version also included a nice chimney, along with a few fire buckets in the lithography.
This simple version I built is definitely slightly bigger than 1/48-scale. Effing around with stuff in MS Paint, one can easily and unknowingly enlarge or shrink the design in the process of manipulating the graphics and printing. I've had this problem on a number of projects, especially where you're working from a pdf file converted to a jpeg format. Replicating colors can also be a pain, but I think that's almost entirely a function of the HP printer I'm using.
Meanwhile, I have two or three other tower versions I want to work on, a couple of which I can't reasonably include on "The Modelers Thread"
The tower looks great!
I think the alternative to fully decorating an interior is the shadow box technique. Create a box with the open side towards the window. Paste a photo or rendering of a detailed interior on it. Glue it to the window with a light below or behind it.
George
What is a 'Conservative'? "Someone who wants society and policy to recognize objective reality- economic, biological, and historical."
—Katy Faust
—Katy Faust
Re: The Modelers Thread
Thanks, George. The next one will be a bit different.
I used that shadow-box technique when I built that faux embossed tinplate station. There was a book stall inside the "tunnel", and I pasted in some lithography I copied off a prewar tinplate station. It turned out well, but of course no one can see it because it's buried nearly out-of-sight.
I used that shadow-box technique when I built that faux embossed tinplate station. There was a book stall inside the "tunnel", and I pasted in some lithography I copied off a prewar tinplate station. It turned out well, but of course no one can see it because it's buried nearly out-of-sight.
Re: The Modelers Thread
The roof on this is fantastic! Makes the rest of the tower really pop. Much of this era was before my time so I can’t say I’m very well steeped in the provenance of such architecture. Regardless, this is really nice modeling, and I’m amazed that it’s cardstock!

Return to “O-Gauge, 3-Rail, Model Railroading”
Who is online
Users browsing this forum: Google [Bot] and 22 guests