Painting wargame figures taught me one very important thing, Greg - the "two-foot" rule, i.e. if it looks good from two feet away, it's likely good enough. Now that may not be true if you're going to be taking close-ups of your figures, but most of the time, you will be looking at them from a considerable distance. Just like when you're looking at a person standing across the street from your house, you can't see their eye color or even the whites of their eyes, so don't try to replicate that.
When I paint figures, I use a block-painting method. Paint 'em as if you were dressing them. Start with all of the exposed skin (face, hands, ankles, etc.) using just a decent flesh color (Tamiya Flat Flesh XF-15 is my preferred acrylic). Don't paint any details for eyes, mouth, ears, fingers, etc., just a basic flesh color. Paint the hair next, than start on the clothes. Shirt, pants, belts, socks, jacket, shoes, hats, kinda in the order that a person would put them on (for example, if a guy is wearing a sport coat, paint that after the underlying shirt and pants as there likely will be some overlap). Again, just basic block-painting...you'll deal with creases and wrinkles later. When choosing colors, lighter tints work better for my method, so if the guy is wearing dark blue pants, maybe use a medium blue when you paint them. A lighter tone will work better when you get to the messy bit.
After you get the basic block-painting done, give the figure an overspray of clear gloss. This is important when you go to the next step. You need the wash to flow to cracks and crevices, not soak into/stain flat paint. Once the clear-coat is dry and hard, you're ready for the messy bit.
Back in the day, wargame figure painters used a wash method referred to as "the dip". After block-painting their figures, they would dip them into a tinted lacquer medium (
Quickshade, by The Army Painter, or one of the dark shades of
PolyShades, by Minwax), coating them liberally with the stuff. Then they would give the figure a flick while holding it with a pair of tweezers, jettisoning the excess. This, of course, is an ungodly mess best done outside while wearing old clothes and standing well clear of anything you don't want to stain with speckles of lacquer. It also, in my experience, can severely darken the figure, a look I don't particularly care for, so I use a different method.
I abandoned the dip method and now just use a brush and a solution recipe of two parts water, two parts Model Wash (Vallejo 76.518 black), and one part Matt Medium (Vallejo 70.540 medium matte). I've used diluted black acrylic paint in place of Vallejo's wash, and you can buy a lifetime supply of matt medium from the artist paint section of your local craft store for not too much more than the cost of a half-ounce bottle of Vallejo's.
I typically work with small numbers of figures, so small batches of wash. In a small saucer, two drops of water, two drops of wash, and a drop of matt medium; mix well and then just slobber it on. The wash should run into all of the cracks and crevices while leaving most of the raised surfaces a slightly darkened version of the block-painted colors. If the wash pools anywhere, use a brush to lightly dab it and remove the excess. It might look hideous, but the transparent wash will likely dry to a light shade, so don't freak out and start brushing it away. Just prop the figure up against a hard surface and let it dry thoroughly.
You get the best results using figures with decent sculpted detail, so lots of well-defined facial features, wrinkled clothing, raised belts, lanyards, etc., will attract the wash and make for for some great "definition". Old vintage figures, or those made from tired molds, not so much. Still, some can yield surprising results. Some of the goofy Plasticville figures can turn out some nice features. Just experiment...
Okay, so once the wash is dry, I usually shoot it with a light overspray of clear flat lacquer (Tamiya TS-80 Flat Clear is my fave). Let that dry, then give the figure a light dry-brush with some white acrylic paint. Dip your brush in a little white paint, than brush it over a napkin or paper towel until you think there can't possibly be any paint left on it. Once you're satisfied that it's paintless, use the brush to lightly dust the figure, trying to hit the raised areas. When you're done with that, give it another shot of the clear flat lacquer, this time more for protection of your paintjob. That's it.
The important bit is that you need to experiment. It's not a fool-proof method. Sometimes (usually) you get a result that's pretty good, but sometimes not so much. It could be the colors darkened up too much for your liking, or the tint might be too light and the details aren't that apparent. Sometimes you might miss removing a pooled area of wash, leaving an unsightly stain on the figure. Easy enough to try again. Just remember the "two-foot" rule. Nine times out of ten, I think you'll find the results satisfactory.
So, back to the original question. If that googly-eyed dude was mine, I'd paint his eyes out with flesh-colored paint, but leave everything else as is. I'd then give him a wash as described above. That face looks like there's enough detail to get some decent tinting around the eyes, the nose, and the mouth, along with some shadowing around the neck. I can't tell if there's any definition of fingers on the hands, but if there is, that will show up as well. The wash will tone down the details (buttons and shirt pockets), while shadowing the creases in his shirt. He should turn out pretty nice, I would think.
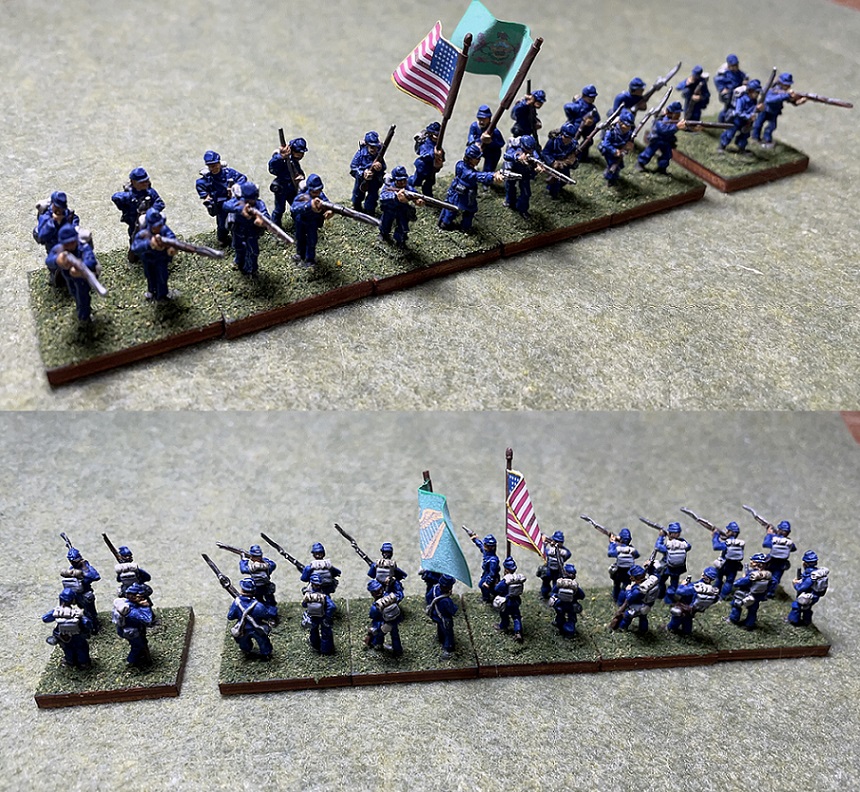
Now, a good friend of mine uses Humbrol enamels to paint his figures (miniature tanks). His tinting medium is black Humbrol enamel thinned with turpentine. He prefers this over acrylics because it takes hours to dry and gives him time to go back and work the wash more into cracks and crevices while removing any excess he discovers. His process typically takes 2-3 days to complete, but the results are extraordinary:

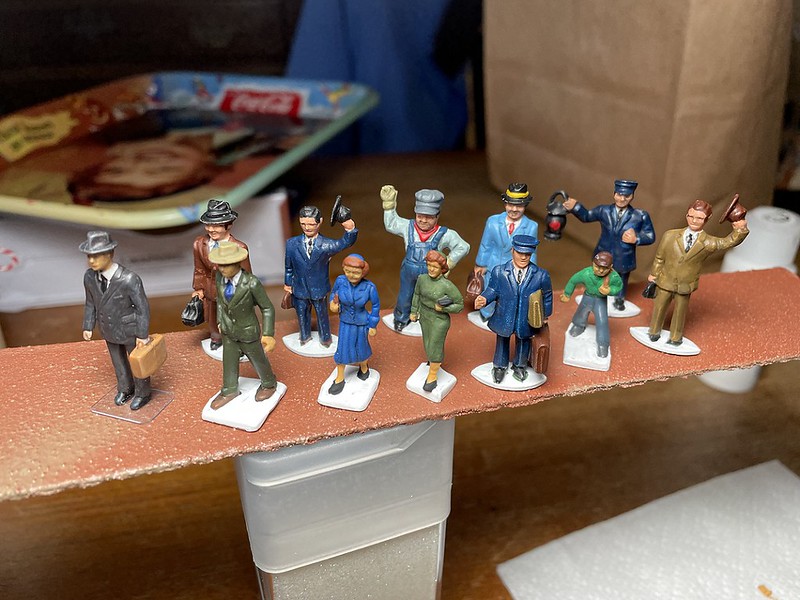
Each of these GHQ miniatures is about the size of a penny (1/285-scale). The castings have terrific detail, which demonstrates what is possible with a well made figure. Sculpted detail is really important for a nice finish. Some of the Arttista figures, like some of the prewar toy train figures, lack in detail, but a decent wash and dry-brush will generally bring out whatever's there.
Buy yourself one of those 100-O-scale-figures-for-ten-bucks bags on eBay and get to work.