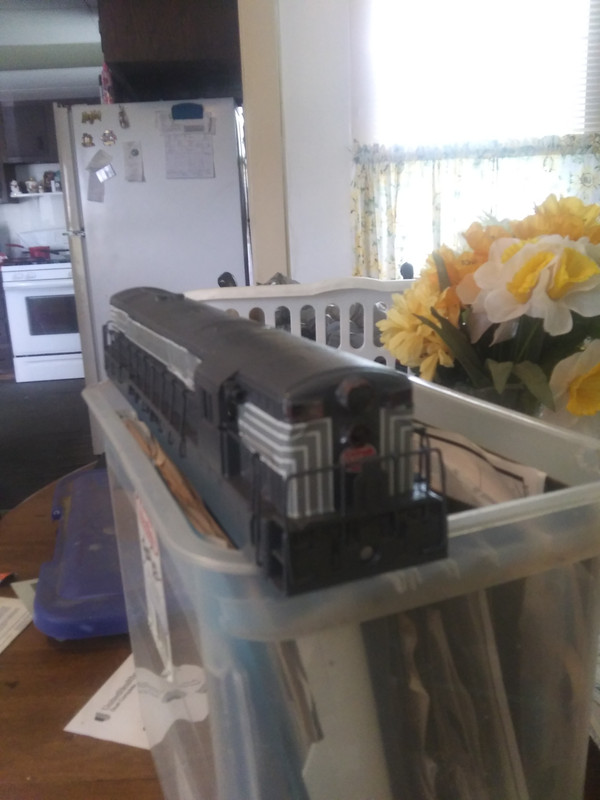
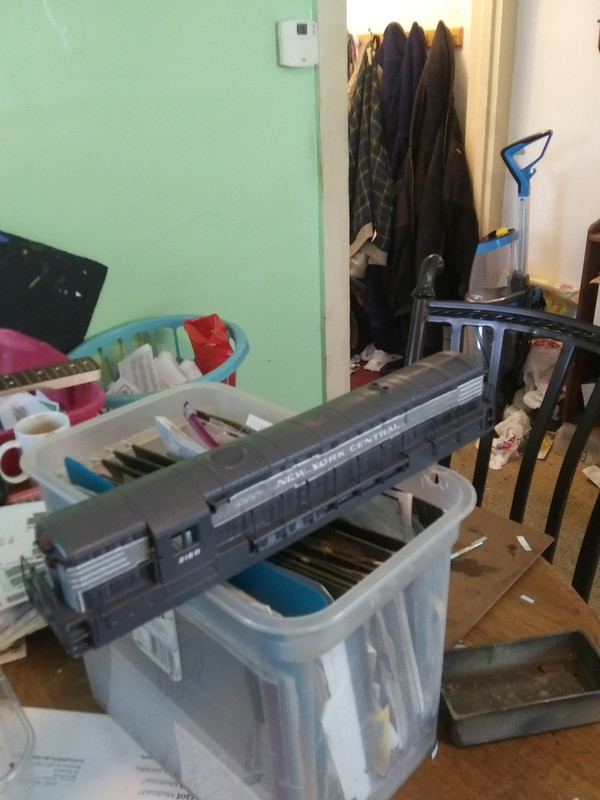
Not easy applying long decal stripes!
Not easy applying long decal stripes!
Quite the challenge!
-
Rufus T. Firefly

- Posts: 42005
- Joined: Wed May 16, 2007 7:52 am
- Location: To be Determined
Re: Not easy applying long decal stripes!
Can be a total PITA exercise depending on whose decals they are and the surface being flat or not.
The average train of thought isn’t big enough to carry a full sized opinion on any subject.
Re: Not easy applying long decal stripes!
The Trainmaster surface has lots if detail so I have to use a lot of setting solution.
-
Rufus T. Firefly
- Posts: 42005
- Joined: Wed May 16, 2007 7:52 am
- Location: To be Determined
Re: Not easy applying long decal stripes!
philo426 wrote:The Trainmaster surface has lots if detail so I have to use a lot of setting solution.
No real choice to get it to settle down tight over that surface.
The average train of thought isn’t big enough to carry a full sized opinion on any subject.

Re: Not easy applying long decal stripes!
It's a challenge just getting the decal off the backing paper without folding up/under or worse yet tearing. Nice job!
Once I built a railroad, I made it run,
Made it race against time.
Once I built a railroad, now it's done --
Brother, can you spare a dime?
Made it race against time.
Once I built a railroad, now it's done --
Brother, can you spare a dime?
Re: Not easy applying long decal stripes!
Thanks!Microscale decals are top quality which helps.
-
Rufus T. Firefly
- Posts: 42005
- Joined: Wed May 16, 2007 7:52 am
- Location: To be Determined
Re: Not easy applying long decal stripes!
philo426 wrote:Thanks!Microscale decals are top quality which helps.
Yes, but thin....and I've had more than a few fold up while applying - bear to unfold and then get straight.
The average train of thought isn’t big enough to carry a full sized opinion on any subject.
Re: Not easy applying long decal stripes!
Yes hace to try to not let that happen..but sometimes it does.
Re: Not easy applying long decal stripes!
I found the trick is to keep it wet as much as possible and use of a number 3 or 4 round sable brush to "unwind" when it gets wrapped.
Once I built a railroad, I made it run,
Made it race against time.
Once I built a railroad, now it's done --
Brother, can you spare a dime?
Made it race against time.
Once I built a railroad, now it's done --
Brother, can you spare a dime?
Re: Not easy applying long decal stripes!
I like to slide it off of the edge and pull the backing paper to the left while holding the decal in position.
Re: Not easy applying long decal stripes!
I like to slide it off of the edge and pull the backing paper to the left while holding the decal in position.
On your FM, I would saturate the area with Micro Set using a flat brush. Then I would probably push the long top edge about 1/4" off the paper and see if it would start to grab onto the model. Using the brush as a pinch point I'd start sliding the paper down making adjustments with the brush, trying to get as much as possible to lay as flat as possible. Once the whole thing is on the model then I would start adjusting the location. Let it dry and start looking for bubbles and other "voids". Take an extremely sharp X-acto and ***** the bubbles or slice corners and start using Micro Sol to set the decal. I used to use Walthers Solvaset for really difficult jobs but it doesn't seem to play well with some of the newer formulas of acrylic paints.
Once I built a railroad, I made it run,
Made it race against time.
Once I built a railroad, now it's done --
Brother, can you spare a dime?
Made it race against time.
Once I built a railroad, now it's done --
Brother, can you spare a dime?
Re: Not easy applying long decal stripes!
Well I put Microsol down before placing the decals.I had to put them in proper position quickly as the Microsol softens the decals rapidly.
Re: Not easy applying long decal stripes!
That's why I put the "set" down before placing and the "sol" down to fix them. I let the decal soak face down in warm water for about 30 seconds (until the backing paper is saturated and then set the decal face up on the edge of a plate (usually a salad plate but for large decals a dinner plate may be required. The edge allows excess water to drain back into the center. Once that's drained I "paint"/flow some of the set onto the decal and watch for when it's ready to release, usually about 30 seconds. Then I brush on the "set" onto the model and start lining up the backing to do the transfer. I will use the brush to move decal around and adjust the location. Once I am satisfied with the placement I let it "dry", occasionally sopping up run off with a brush that has been rinsed in water and wiped on a cloth or paper towel so I can wick up the excess setting solution. After I am satisfied with the placement I will start using the "sol" to set the decal. This is to "wring out" the wrinkles and settle down/out any bubbles. It may take two or three applications to get a complex decal to settle down.
This is a time consuming process and it's probably my least favorite aspect of modeling. You are so close to the finish line but also so far away. A good set of decals that are properly applied can really enhance a model. I've started making cardboard jigs out of the amazon boxes to make cradles to hold the models in position this freeing up both hands. With hot melt glue and package sealing tape I can knock out a cradle in about 10-20 minutes. Sometimes I make two or three to hold the model in different positions, e.g. wings level vrs wings veritcal.
This is a time consuming process and it's probably my least favorite aspect of modeling. You are so close to the finish line but also so far away. A good set of decals that are properly applied can really enhance a model. I've started making cardboard jigs out of the amazon boxes to make cradles to hold the models in position this freeing up both hands. With hot melt glue and package sealing tape I can knock out a cradle in about 10-20 minutes. Sometimes I make two or three to hold the model in different positions, e.g. wings level vrs wings veritcal.
Once I built a railroad, I made it run,
Made it race against time.
Once I built a railroad, now it's done --
Brother, can you spare a dime?
Made it race against time.
Once I built a railroad, now it's done --
Brother, can you spare a dime?

Re: Not easy applying long decal stripes!
Things might be a bit easier if you are applying the decals to a glossy surface. You'll get a bit of extra time for positioning, and I find they "bind" better to a shiny surface. I typically soak a decal for 30 seconds or until it easily moves on the surface of the paper. I apply a thin coat of MicroSol, then apply the decal on top of that. Get it positioned, then another light coat of MicroSol over top. Tweak the position if you need to, but at this point, best left alone. When everything is thoroughly dry, an overspray of Tamiya clear matte.
Hull lines on ships are long thin lines that can be painful. I usually apply a straight bit of masking tape an eighth of an inch or so above where the decal line will be applied. This is just a visual aid for positioning the decal; it in no way "masks" the decal or maintains a straight edge. I have good luck getting a long straight position using this method, especially if you have a minute or two to move things around.
That said, everybody I talk to has a slightly different method of applying them. I, for one, never use "set", as the "sol" gets them onto the surface nicely and the overspray of clear lacquer seems to bind them for perpetuity.
I enjoy applying decals (much more than painting). Good quality decals make the model.

Now if I could find a water-based wash formula that works consistently...
Hull lines on ships are long thin lines that can be painful. I usually apply a straight bit of masking tape an eighth of an inch or so above where the decal line will be applied. This is just a visual aid for positioning the decal; it in no way "masks" the decal or maintains a straight edge. I have good luck getting a long straight position using this method, especially if you have a minute or two to move things around.
That said, everybody I talk to has a slightly different method of applying them. I, for one, never use "set", as the "sol" gets them onto the surface nicely and the overspray of clear lacquer seems to bind them for perpetuity.
I enjoy applying decals (much more than painting). Good quality decals make the model.
Now if I could find a water-based wash formula that works consistently...
Return to “O-Gauge, 3-Rail, Model Railroading”
Who is online
Users browsing this forum: No registered users and 7 guests