Reworking a Great Western 4-4-0

Discuss All Facets of 2-Rail, 1/48 Scale, Model Railroading
Johnbeere
Posts: 12
Joined: Sun Mar 19, 2023 10:14 pm

Reworking a Great Western 4-4-0

Postby Johnbeere » Fri Sep 06, 2024 11:55 pm

Cross posting from the other forum, with some added context... hopefully I get the photos right:

It's now been over 2 years since I got my Great Western 4-4-0 - It's been sitting on a shelf all that time, always bothering me with how close - yet so far - it is from being a proper scale model, the proportions off just enough to not look quite 'right'. I had always thought that the cab needed to be shorter and the entire boiler needed to be lowered and moved back. Well, I've finally got free time again to work on these old models (I've gotten a '31 Ford that I've been working on for the last couple years in my free time), so I decided to finally tackle correcting this model. It's not done, but I've made significant progress.

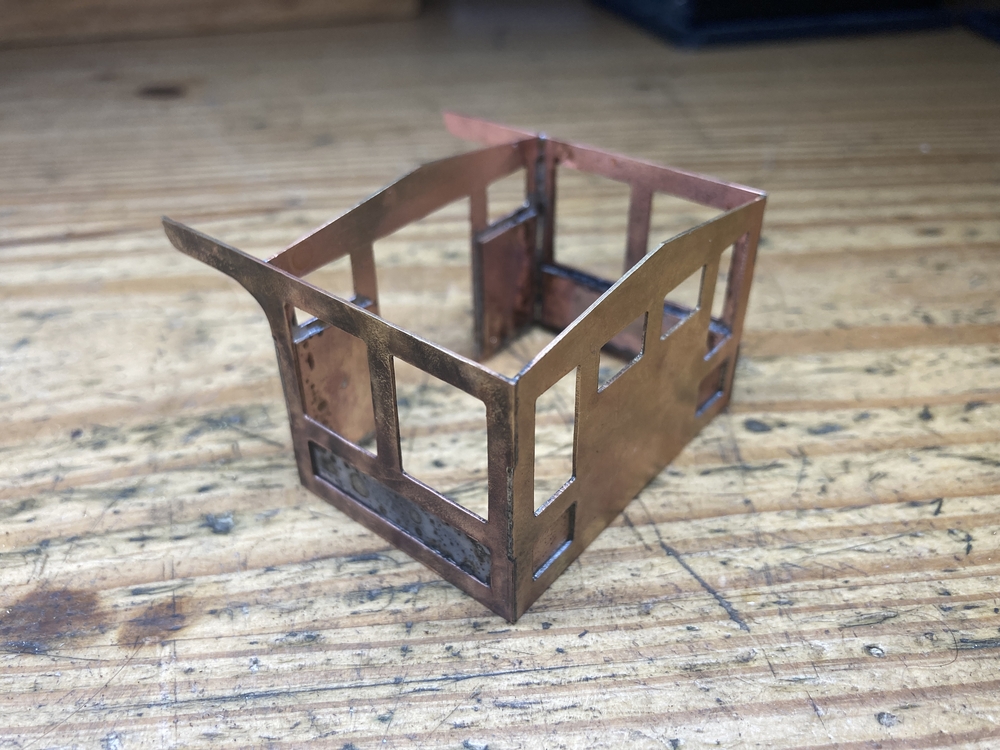
I first started by fabricating a new cab out of brass - this was really a test of my skills, and is probably the most complicated part I've fabricated so far, but I'm very happy with how it turned out. I based the dimensions of the cab on CP 173, due to the fact that it shares similar dimensions and 54" drivers.

Image

Image

Image

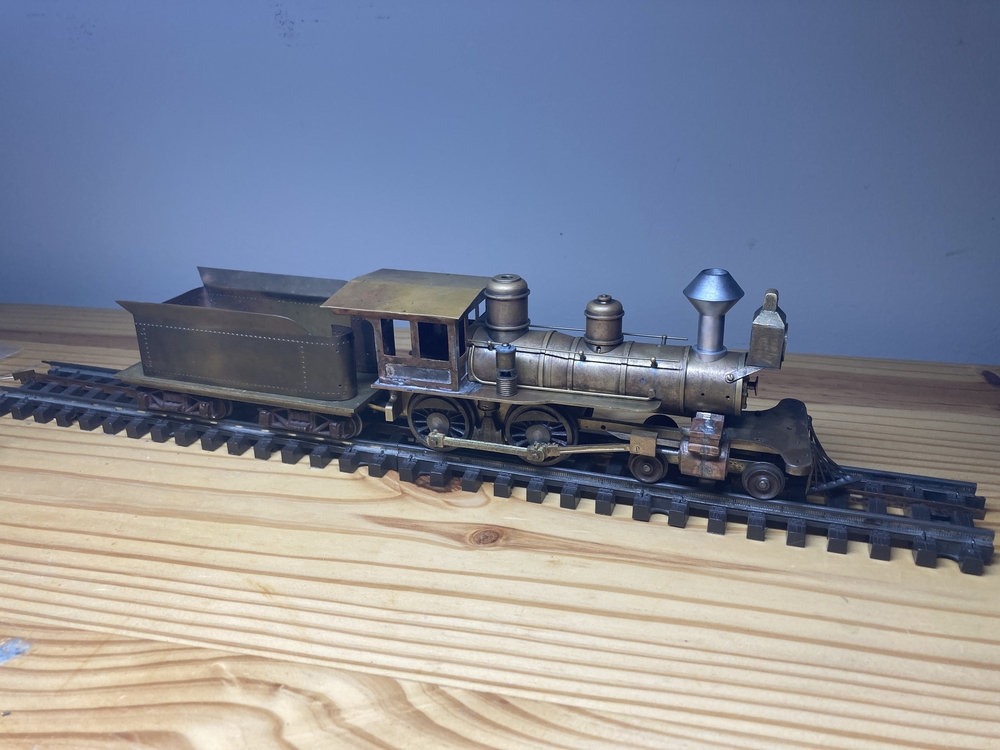
I then fit the cab to the loco, being very careful to set the running board in the correct positions for soldering. Also note that it now has the correct tender trucks, that I very fortunately stumbled across on Ebay.

Image

And then lowered the whole boiler 1/8", requiring much of the running boards, frame, and steam chest to be cut and filed down...

Image

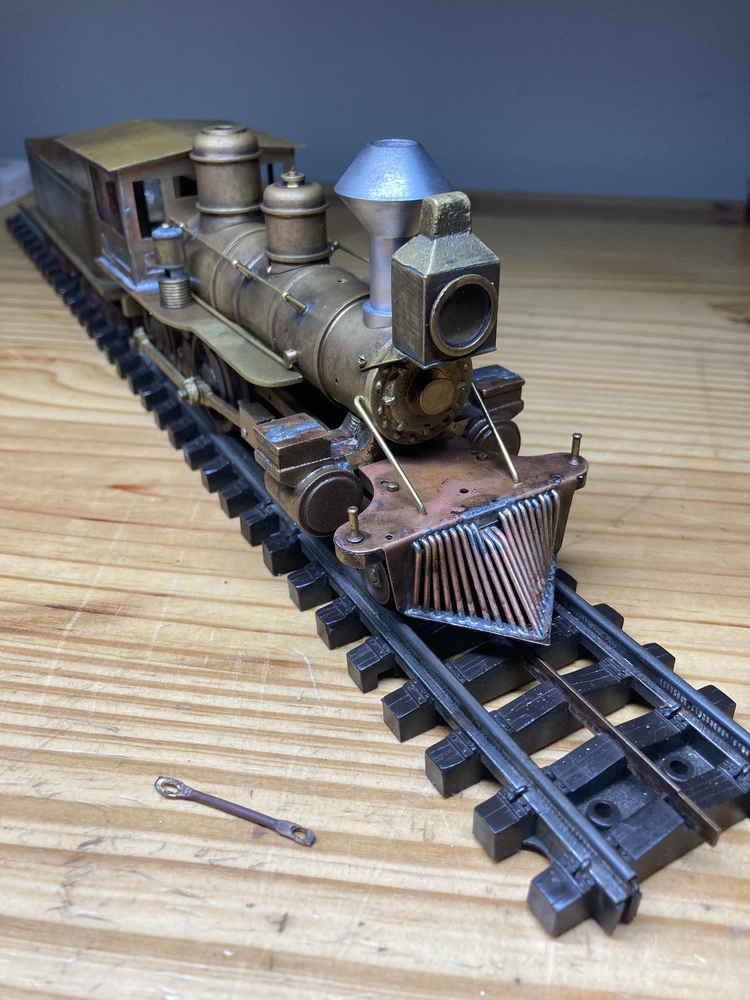
I then reworked the pilot, moving it backwards 1/8", and doubling the number of bars from 11 to 21. I intend to set this loco up with link and pin couplers, note the WIP front link sitting next to it. I'm experimenting with actually forging the front link from a brass bar like the real thing. The holes in the end of it were punched through and expanded, rather than drilled.

Image

I also cut the side boards off the tender in preparation for shortening the tender tank 3/16", such that the top of the tank is lower than the cab windows. I'll then fabricate a new top cover to the tank.

Image

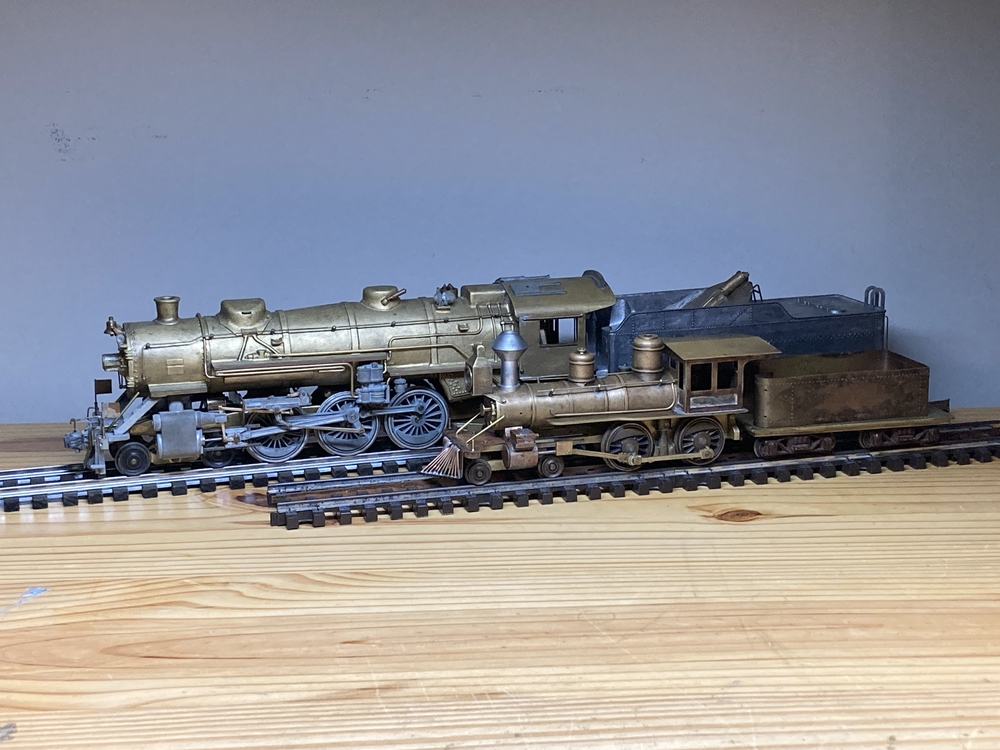
And here it is sat next to my GMC pacific for scale...

Image

I've still got a long way to go, but I'm very happy with how it's turning out. I don't believe I've seen any properly proportioned 4-4-0 models of this age, so I'm very happy to have one for myself. There is a bit of a dilemma of whether or not a model of this age and rarity should be so modified, but it's certainly still a Great Western 4-4-0 at its core, and the modifications really are showing its potential.

I've been debating how I'm going to power it - I don't think I can obtain an original drive for it, so I'm going to retrofit a NWSL 253-6 gearbox into it, with a motor in the tender. I believe it came with a Pittman DC92 originally, but those stick out the top of the tender quite a bit. I've tried a DC91, which looks like it ought to fit, but doesn't quite. I've also got a Pittman can motor that does fit very well, but I'd much rather use a period correct motor. I'm considering a DC71 - I've bought one from Ebay to see how it will fit. They're typically HO gauge motors, but ought to fit this loco. I just don't know if it will be powerful enough, but this is a small loco, and will only ever pull 2-3 cars at most.

Here's how it looked when I first got it, 2 years ago, from Ebay:

Image

And after its initial restoration...

Image

User avatar
webenda
Posts: 15341
Joined: Sun Jan 09, 2005 4:05 pm
Location: Columbia

Re: Reworking a Great Western 4-4-0

Postby webenda » Sat Sep 07, 2024 8:10 am

Johnbeere wrote:Cross posting from the other forum, with some added context...

Here's how it looked when I first got it, 2 years ago, from Ebay:


Johnbeere, looks great.

I can't see the last two images. I get, "You do not have permission" when I try. That's OK, I enjoyed seeing your work on this model.

Edit 1: Last two pictures now show up. I deleted them from this post (no need to repeat images.)
Edit 2: Put back end quote that I accidentally deleted in Edit 1. :(
Last edited by webenda on Sat Sep 07, 2024 2:17 pm, edited 2 times in total.
----Wayne----

Back when I was growing up, if you didn't start someth'n, there wouldn't be noth'n.
--Merle Haggard

Johnbeere
Posts: 12
Joined: Sun Mar 19, 2023 10:14 pm

Re: Reworking a Great Western 4-4-0

Postby Johnbeere » Sat Sep 07, 2024 10:07 am

webenda wrote:I can't see the last two images. I get, "You do not have permission" when I try. That's OK, I enjoyed seeing your work on this model.


Thanks - hopefully fixed now.

User avatar
De Bruin
Posts: 981
Joined: Thu Jan 12, 2017 8:24 pm

Re: Reworking a Great Western 4-4-0

Postby De Bruin » Sat Sep 07, 2024 10:43 am

Opinion, this is such a good rebuild that I would use the can motor if it’s indeed the best fit and it gives the desired performance. I respect building/rebuilding older kits with as much of the original “recipe” as possible but this is such a rare model, and you’ve made significant changes to it already that enhance it way above its original appearance.

This is Great, thanks for posting all the in process photos too.
Pete
Political Consultant- Tap into the hidden powers of your public office, insure your future is jail free, well funded. Visit shock and awe upon your adversaries, dominate the media, thrill your followers. contact morbo@happydaysrhereagain.com

bob turner
Posts: 13438
Joined: Sat Jan 13, 2007 7:57 pm

Re: Reworking a Great Western 4-4-0

Postby bob turner » Sat Sep 07, 2024 2:20 pm

Agree. Very nice work, and thanks for sharing. Once you change the cab, you are no longer in preservation territory, so a motor change is not destroying any value one might place on an absolutely original restoration.

These smaller locomotives are not really my cup of tea, but I have always admired them from a distance. And now I know the provenance of a few very nice arch bar sideframes I have had my hands on in the past.

Johnbeere
Posts: 12
Joined: Sun Mar 19, 2023 10:14 pm

Re: Reworking a Great Western 4-4-0

Postby Johnbeere » Sat Sep 07, 2024 3:39 pm

Thanks guys - I definitely agree that the best choice is the can motor, but there's always been something charming about the old open frame motors to me. Definitely if the open frame motors don't work out, I'll go with the can. Does anyone have experience with Pittman DC70/71/81 motors, what's the chance an HO motor will drive this well enough?

I guess my interest in these old models lies largely in what's period-correct for the 40s and 50s - I'm not so much interested in turning it into a super-detailed model, but rather making it as detailed as I can with period techniques and fabrication out of brass. I guess I've already sacrificed that a little with the NWSL gearbox, but it's beyond me to come up with anything different.

As a side note, I haven't got the gearbox yet, but I'm wondering how I'm going to mount it. Isn't the drive gear a press fit onto the axle? Problem is that these are the old Athearn drivers that have a screw in the middle of the axle - right where the gear will be pressed over it. On top of that, the axle can't be dropped out of the frame, but must be split to remove it. I'm thinking I may need to cut away the frame below the rear axle such that it can be dropped, but I also don't know how I can even assemble the axle with the gear in place. All of that would be solved if the gear was held on by a set screw and could be slid on the axle when loose, which is probably how the original was, but I don't think I can do that.

Johnbeere
Posts: 12
Joined: Sun Mar 19, 2023 10:14 pm

Re: Reworking a Great Western 4-4-0

Postby Johnbeere » Sat Jan 18, 2025 12:54 am

Well it's been a while since I posted, but I've made some progress. In my last post I mentioned I wanted to shorten the tender and figure out how to power the loco, and I think I've got it figured out now.

To start on the tender, I desoldered the old mounting plates from the tender shell, and then annealed and flattened it to prepare for reshaping and shortening.

Image

Image

I proceeded to clean up the metal, and I created two scribe lines just outside the rivets, and cut it down to that line, so the entire tank is vertically shorter. I then had a jig with the right curves 3D printed so I could form the shell into a better shape. Originally the rear corners were square, but I formed them with a 1/8" radius, and the front with a 1/4" radius.

Image

After shortening the tank, I decided the entire tender was simply too long, so I cut about 1/4" out of the middle of the frame and soldered it back together shorter. Unfortunately this means that the Pittman can motor I mentioned previously would no longer fit, but I'd prefer an open frame motor regardless.

Image

Upon reassembly, I'm very happy with the new proportions - much better than it was.

Image

Since the rear corners were now radiused, the tender boards needed to be radiused as well. The math and scribe lines were a little difficult, but I got there in the end.

Image

Before I made the boards, I soldered in the top plate for the tender, which was fairly difficult to keep the plate fully lined up with the shell. I didn't want to re-do that solder joint again, so I decided to rivet the boards in plate, with a little added solder between the seams. I also fabricated a water hatch for the tank and a little bracket to hold the brake wheel.

Image

And back to the loco, I revisited the bell. I was able to reuse the old stand, but I had to fabricate a new yoke.

Image

I also got the front coupler link finished and installed, and while I don't have any link and pin cars, it's functional. I decided to trim off the taper that was on either side of the pilot, giving it straight sides. You can see in this photo how wide the slide valves are - at some point I intend to cut both off and relocate them further inboard.

Image

I also found that a Pittman DC81 fit inside the tender very well, so I fabricated brackets to hold it in just the right position and angle.

Image

And I was able to fit a NWSL gearbox between the rear drivers. Unfortunately, due to the pressed on drive gear, I had to cut slots in the frame so the rear axle could be removed, so I fabricated a couple brass plates to hold the axle in place.

Image

And I found a small silicone tube that's flexible enough to handle the job. It's not suitable for stronger motors, but works well for this little engine. It's not visible, but I had to add a little brass link from one of the screw holes of the gearbox to the loco frame to hold the gearbox at a suitable angle, otherwise it wanted to flex up and down. After quite a bit of fine tuning, the motor and gearbox drive it along very well, and it can pull a few cars easily.

Image

And finally a photo as she sits today - a much finer model than she was back in '49. Lot of work left to do, but I'm very happy with my progress so far.

Image

bob turner
Posts: 13438
Joined: Sat Jan 13, 2007 7:57 pm

Re: Reworking a Great Western 4-4-0

Postby bob turner » Sat Jan 18, 2025 11:55 am

Very nice work, and good photos.


Return to “O-Gauge, 2-Rail, Model Railroading”

Who is online

Users browsing this forum: No registered users and 17 guests