Jim,
I'll mail them to you. I'm sure some are worthless. Hopefully, a few are usable.
Just in case I don't have it, please email your address.
Any other roads of interest?
Jay
The "Woody" D&H Challenger
-
bob turner
- Posts: 12858
- Joined: Sat Jan 13, 2007 7:57 pm
Re: The "Woody" D&H Challenger
Boiler is coming along. The 0-80 threads for handrail posts exist, making that part really easy. Boiler bands, tanks, and reverser are all on, and remaining are the top check valve and a few pipes. Leaving Wednesday on a flight up to Shasta, but may be finished by then. Photo as soon as I get the second bead blast done.
Update -noon. All the original piping (at least that supplied) is re-installed. I need to do a couple extra rods and air pipes, plus two lines to the check valve and four pop valves. And those washout plugs. And slip the handrails into their posts after Monday’s bead blast.
In short - almost done.
I am going to fit the mechanism, then separate for shipping. I am going to assume Dave’s mechanism test is definitive - my railroad is down for a while.
After blast photos, handrails, prime, some light filler, and gloss black. Wish I could do it in Scale Coat - probably be rattle can. Airbrush is operative, but all my paint died a long time ago.
-
Jay Criswell
- Posts: 1980
- Joined: Thu Mar 06, 2008 12:38 pm
Re: The "Woody" D&H Challenger
Bob,
I have a fairly large order in for some Scale Coat, including black. Having said that I can probably spare 1 bottle now. Is that enough? About all I use it for anymore is gearboxes, the under side of frames, trucks, and fuel tanks. With the heat we're experiencing right now I won't be painting anything for some time. Hopefully, what I bought, and paid for 4 months ago, shows up some time this year.
Now tell me about the clean out plugs. Part # or diameter of the holes.
You have the threaded stanchions covered, right?
Jay
-
bob turner
- Posts: 12858
- Joined: Sat Jan 13, 2007 7:57 pm
Re: The "Woody" D&H Challenger
First order of business - I need six threaded handrail posts of medium length. I will get an exact measurement. I have shorter ones and longer ones, but so far my search hasn't turned up the exact part. Measurement is .200 from top of ball to the part that contacts the boiler - that is, length of everything but the threaded part.
The washout plugs are rimmed, and go into a 1/8" hole (#30 drill). The rims have four simulated rivets, although that is not important. I would give you Bob Smith's part number, but Lou has that number attached to a different part. I need 3.
I have found the best coating for steamers is high gloss Scale Coat, baked on. I now simulate that with DupliColor rattle cans. Is this the stuff that can be thinned with lacquer thinner?
I am so close - I may be giving it the final bead blast tomorrow!
I have the feeling that I won't be shipping to Jim before about July 20 or so - heading to Trinity Center next week in one of the Cubs. Hot out there!
-
Jay Criswell
- Posts: 1980
- Joined: Thu Mar 06, 2008 12:38 pm
Re: The "Woody" D&H Challenger
Bob,
I looked through my stanchions with an eye out for the threaded versions. If .200" is what you require, I will measuring. Is diameter important? I think I can spare a few.

I'll look for the washouts. I had a bunch but, like so many things, they're spread out over way to many projects, in boxes.
I would never thin Scale Coat with Lacquer thinner. I'm a firm believer in using the manufacturer's thinner. Cleanup? Sure, lacquer thinner is my go to.
If July 20th is the magic date, I'd say we're running out of time.
Jay
I looked through my stanchions with an eye out for the threaded versions. If .200" is what you require, I will measuring. Is diameter important? I think I can spare a few.
I'll look for the washouts. I had a bunch but, like so many things, they're spread out over way to many projects, in boxes.
I would never thin Scale Coat with Lacquer thinner. I'm a firm believer in using the manufacturer's thinner. Cleanup? Sure, lacquer thinner is my go to.
If July 20th is the magic date, I'd say we're running out of time.
Jay
-
Jay Criswell
- Posts: 1980
- Joined: Thu Mar 06, 2008 12:38 pm
Re: The "Woody" D&H Challenger
Bob,
I picked out a few that should provide what you need for this project but I had one of my infamous epiphanies. Since I don't use the threaded stanchions and you do, why don't I just send you all of them? Should keep you supplied for a while. Think of it as going from my Future Estate Sale to yours.
Jay
-
big bad jim

- Posts: 435
- Joined: Wed Oct 06, 2010 12:38 pm
Re: The "Woody" D&H Challenger
The threaded rod comment a page or so back reminded me, I believe Bob talked about using brass threaded rod or pins to plug drilled and tapped holes in diecast, which could then be soldered to. I seem to recall reading it on this forum quite some time ago, but I can't find it with a search. Of course topics have gotten dumped more than once, so it probably just disappeared at some point.
Anyway, could somebody explain the technique again, specifically how the threaded rod is held in place. I seem to recall a mention of one of the varieties of JB Weld? The backside of many of these plugs won't necessarily be hidden inside a boiler or shell, so I need a method that is sturdy but also aesthetically inconspicuous. I'm not asking for much.....

Thanks,
Jim
Anyway, could somebody explain the technique again, specifically how the threaded rod is held in place. I seem to recall a mention of one of the varieties of JB Weld? The backside of many of these plugs won't necessarily be hidden inside a boiler or shell, so I need a method that is sturdy but also aesthetically inconspicuous. I'm not asking for much.....
Thanks,
Jim
-
bob turner
- Posts: 12858
- Joined: Sat Jan 13, 2007 7:57 pm
Re: The "Woody" D&H Challenger
Was not me. But I do plug holes with brass threaded stuff.
For die cast, I attach brass with 2-56 pins and JB Weld. Attaching pumps, reversers, tanks, etc I always use screws.
On the D&H, as you will see (last bead blast was today) almost everything was hung with 00-90 brass screws. I drilled them out and used 0-80 steel. The tanks are now solid brass, and screws are countersunk. After priming, the holes get body putty.
I want to assemble and take some photos before the sun goes down. May have to have coffee first.
Jay, I will get a photo of one of the "blocked out" Mikes at the same time, and post it here. Yevs, I go freaky over threaded posts - they are all I will use. A 1/16" thick boiler takes a lot of heat to solder in such things.
-
big bad jim
- Posts: 435
- Joined: Wed Oct 06, 2010 12:38 pm
Re: The "Woody" D&H Challenger
Okay, thanks Bob. I could have sworn it was you, but it was quite a while ago.
Jim
Jim
-
ScaleCraft

- Posts: 6463
- Joined: Thu Jan 26, 2012 10:15 pm
- Location: Floe Ice, Auntarctica
Re: The "Woody" D&H Challenger
The "definitive test" was an old MRC H0 pack with alligator clips. Then oil, then re-test.
I do know commutators need to be cleaned.
No idea how it works on rail, but the reason I tied the chassis down to plywood was to make sure it didn't get any worse!
I do know commutators need to be cleaned.
No idea how it works on rail, but the reason I tied the chassis down to plywood was to make sure it didn't get any worse!
Dave....collector, restorer, and operator of the finest doorstops
-
bob turner
- Posts: 12858
- Joined: Sat Jan 13, 2007 7:57 pm
Re: The "Woody" D&H Challenger
For Jim - one way to get screws to stay put in die cast is to incompletely tap the hole. Then it is like pipe threads - ain't never gonna come out.
So, success! Sun is getting too low, but photos are in the can. One of the Mikado photos has a wheel off the track to get Dave all excited.
So, success! Sun is getting too low, but photos are in the can. One of the Mikado photos has a wheel off the track to get Dave all excited.
-
bob turner
- Posts: 12858
- Joined: Sat Jan 13, 2007 7:57 pm
Re: The "Woody" D&H Challenger
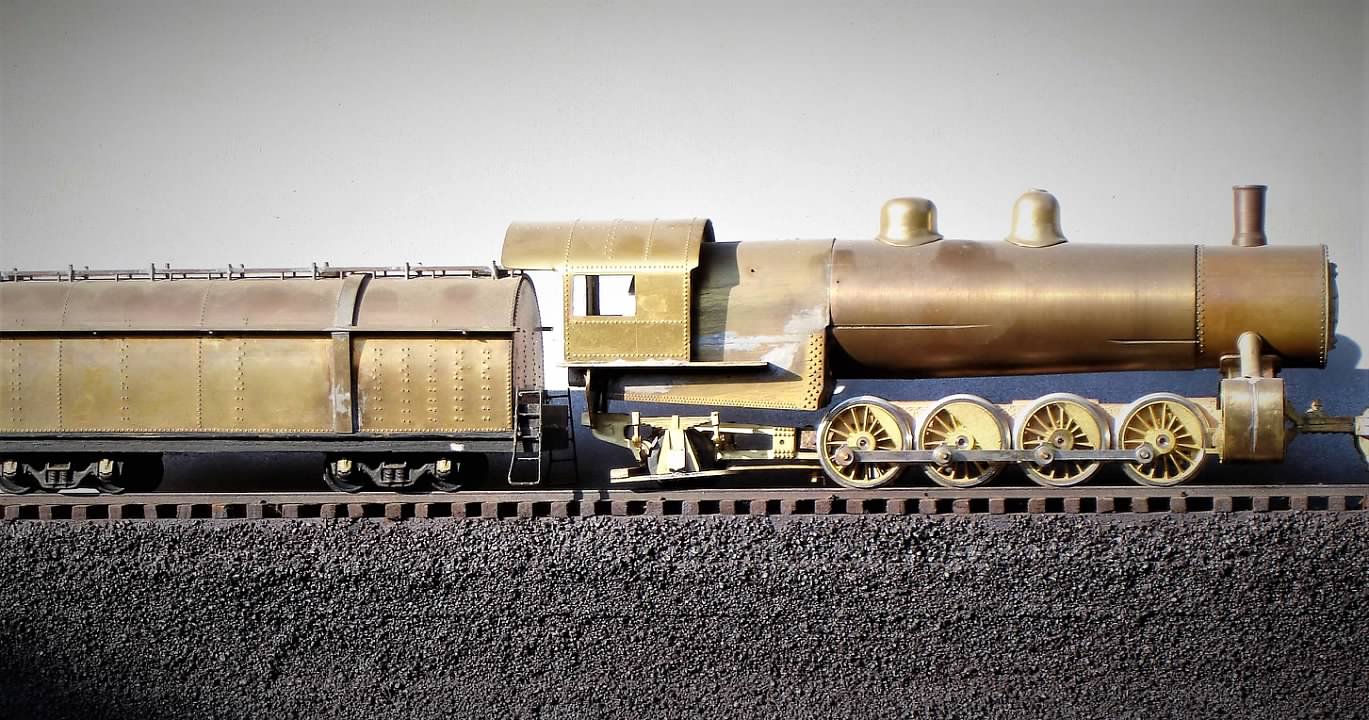
First the almost-finished D&H. Note the hole in the air tank. Gets filled. I was going to bolt the boiler to the mechanism, but the Sun was not cooperating.
Handrails, tank bands, half the throttle rod - all to go, and I need to "fit" the steam lines for easy assembly when it gets to Dallas.
Herewith:


Handrails, tank bands, half the throttle rod - all to go, and I need to "fit" the steam lines for easy assembly when it gets to Dallas.
Herewith:
-
bob turner
- Posts: 12858
- Joined: Sat Jan 13, 2007 7:57 pm
Re: The "Woody" D&H Challenger
Now for Jay, and shared here just to entertain the rest of you - this is what I mean by "blocked out:"
Boiler barrel is genuine Lost Wax Lobaugh. I think its sister is at your place. Frame is Berkshire, which turns out to be the same wheelbase as the prewar Lobaugh Mike. I cut the rear off and make brass tailbeams to fit the Hodges truck. This truck is a Pearce/Stevenson, but CLW has a beautiful version that is not quite so picky about where the leaf spring is supported. Cylinder block is Lost Wax Mike.
Drivers are coined Loco Works, but I always use cast-iron Berk drivers, or the Henry Pearce equivalents. Henry's had better counterweights for SP models.
The Lost Wax frame was a machined affair - wheelbase was just enough different that new rods had to be made. I think Stevenson has both sizes of rods, and I just heard from him this week - he is pouring hot metal!
The Mike had almost any kind of tender you can think of, including that neat switcher tender that jumped the track. Lobaugh supplied the world's ugliest Vanderbilt with the kit - that tender existed only on 2-`10-2s in the beginning, and one is preserved behind Joe Dale's Mogul. I prefer either the 120C tenders, or a haystack. Haystacks are easy to "Block out," at least the body part.
So, here it is - awaiting nice things like rods, running boards, handrails, boiler bands, etc etc
-
R.K. Maroon

- Posts: 2939
- Joined: Tue Feb 22, 2011 9:20 pm
Re: The "Woody" D&H Challenger
The D&H is looking really great, Bob. Do I understand that you removed all the paint with the bead blaster? For some reason I can never get it to all come off when I do that. Maybe it's simply that you're working with a mostly smooth brass model and I am usually dealing with some rough sand cast item. But still, I am surprised that the paint comes out of the seams as well as it does.
Jim
Jim
Slow progress is better than no progress
-
Jay Criswell
- Posts: 1980
- Joined: Thu Mar 06, 2008 12:38 pm
Re: The "Woody" D&H Challenger
Bob,
Thanks for sharing. Let's see, I have two mike boilers from Bob S, the prewar Loubaugh you sent me long ago, and whatever boiler is in this other kit. I suspect it's a berk. I'll dig it out and take a look.
Many of the castings for my Lost Wax Mike were actually done by Dennis.
Okay, not a question for you, do you want a bottle of SC Black, the missing .200" stanchions, and the washout plugs? I can send all tomorrow along with all the threaded stanchions.
Jay
Return to “O-Gauge, 2-Rail, Model Railroading”
Who is online
Users browsing this forum: No registered users and 14 guests