Thanks Sarge and Dan, and the Yarmouth website has some nice goodies I didn't know about.
Great stuff everyone. This thread looks promising.
What’s on your Workbench?
-
Chris Rock
- Posts: 1480
- Joined: Fri Sep 23, 2005 6:08 pm
- Location: United States
Re: What’s on your Workbench?
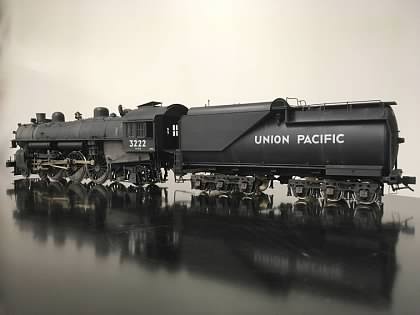
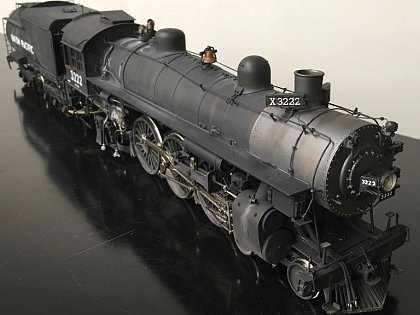
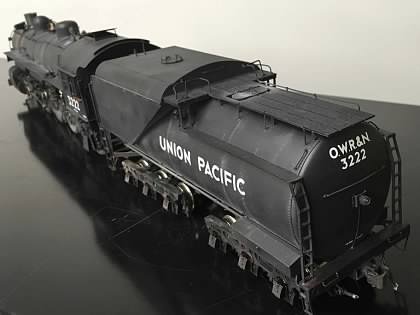
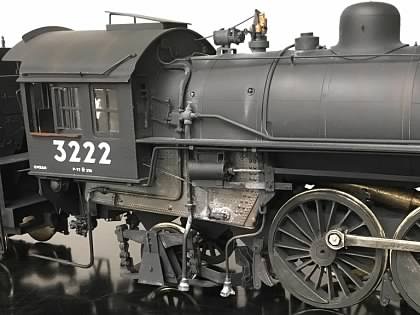
I recently painted/decaled/weathered this:
Next project is awaiting PSC order.
Next project is awaiting PSC order.

Re: What’s on your Workbench?
Some really good stuff going on, everyone!
Once the disruption of the backscene painting is over, I’m looking forward to getting back to operations for a while before the next layout project (probably ballast and groundcovers).
Meanwhile, a set of O Scale icons has found its way here:


These are John Armstrong’s Erie F7s and the caboose he built, all from Atlas/Roco models back in 1976. Art Selby, who’s railroad Dan featured back in the spring, owned them. Sadly, not long after his railroad published, we lost Art (at 92, so a rich full life anyway). He had expressed his desire these would come to me, so arrive they did. They’ve now been through the workshop and tidied up a bit, ready to go to work.
I’m working on an operating scenario featuring the north end of the Elmira Branch of PRR which was a very unique operation involving pooled power from New York Central into Southport and interchange with Erie out of Hornell. These will be a part of that scenario.
Once the disruption of the backscene painting is over, I’m looking forward to getting back to operations for a while before the next layout project (probably ballast and groundcovers).
Meanwhile, a set of O Scale icons has found its way here:
These are John Armstrong’s Erie F7s and the caboose he built, all from Atlas/Roco models back in 1976. Art Selby, who’s railroad Dan featured back in the spring, owned them. Sadly, not long after his railroad published, we lost Art (at 92, so a rich full life anyway). He had expressed his desire these would come to me, so arrive they did. They’ve now been through the workshop and tidied up a bit, ready to go to work.
I’m working on an operating scenario featuring the north end of the Elmira Branch of PRR which was a very unique operation involving pooled power from New York Central into Southport and interchange with Erie out of Hornell. These will be a part of that scenario.
Re: What’s on your Workbench?
Beautiful models, sarge!
IMO, we need a thread like this, always nice to share techniques and stuff being built.
IMO, we need a thread like this, always nice to share techniques and stuff being built.
Re: What’s on your Workbench?
Next diorama has been painted and the buildings put back, albeit with a few tweaks.


Last section has been stripped out and ready to rock next week.
Last section has been stripped out and ready to rock next week.
-
Chris Webster
- Posts: 927
- Joined: Mon May 25, 2015 8:25 pm
Re: What’s on your Workbench?
^ Has anyone told you about how Dan Mansfield keeps dust off his layout?
(Instead of installing a ceiling, he stapled black landscaping fabric to his floor beams.)
(Instead of installing a ceiling, he stapled black landscaping fabric to his floor beams.)
Re: What’s on your Workbench?
Chris, this is an area where (once again) I flout tradition (I call it “Kalmbach wisdom”).
That insistence on drop ceilings and such denies one the opportunity for just tons of safe convenient storage for rolling stock. The idea goes back to when I used to visit Chick Siebert, a well-known traction modeller. He kept his collection of memorabilia up in the joists on display. I figured if it worked for railroadiana, it would work for rolling stock.
The tinplate collectors have a range of aluminium extrusion shelves sold by Glen Snyder Display Systems. I’ve screwed a quantity of them up in the joists, and the locos and stock for operating scenarios not on the railroad at a particular time are stashed safely away; huge quantity of storage that is far easier on model details than putting them in boxes, doesn’t require wall space, or require shifting and crawling about under the benchwork.
If you go to a multi-scenario operation rather than a single theme railroad, storage becomes a first-order consideration, and this is a really safe and convenient way to get the storage requirement needed to go beyond traditional single-theme layout design.
As far as dust, I have not found a significant amount of it such that I believe a drop ceiling or cloth would significantly reduce it. When I first bought the house, I laid out a piece of black and of beige construction paper just to see what rained down from above. Turned out to be nothing of great significance and the reliability of the railroads built in this space rather confirm it.
Re: What’s on your Workbench?
Meanwhile, in the paintshop, we have four old Weaver Alcos getting tarted up to be added into two different scenarios.
The FAs are destined for a Lehigh Valley in 1961 scenario that is just starting to be built. They both had the same number, so a thumb-full of fine wirewool lifted the printed numbers off of one, followed by some detailed reshoots of the striping where it wore away. Ready for decals.

This RS-3 is also ready for decals, in this case painted to fit in the LV/BR&P 1974 scenario. Drive is also done.

Weaver did the “experimental” wide-stripe scheme that one Geep and one RS-3 wore. Oddly, they got the number wrong somehow, 218 rather than the correct 216. No matter, for another thumb-full of wire wool gets us ready to reletter.

Time to build drives!
The FAs are destined for a Lehigh Valley in 1961 scenario that is just starting to be built. They both had the same number, so a thumb-full of fine wirewool lifted the printed numbers off of one, followed by some detailed reshoots of the striping where it wore away. Ready for decals.
This RS-3 is also ready for decals, in this case painted to fit in the LV/BR&P 1974 scenario. Drive is also done.
Weaver did the “experimental” wide-stripe scheme that one Geep and one RS-3 wore. Oddly, they got the number wrong somehow, 218 rather than the correct 216. No matter, for another thumb-full of wire wool gets us ready to reletter.
Time to build drives!

Re: What’s on your Workbench?
I need a tutorial on the wire-wool method.
Re: What’s on your Workbench?
We can do that, Healey.
For the rest here:
What you want is a fine wire-wool so you can do this without fear of ruining cast-in detail or scoring the surface.
I pull a little chunk off so it can be held between thumb and forefinger then start in on the lettering you want to remove, gently at first until you get the gauge of what you want to remove.
You can mask the printing you want to keep or the lion’s share of the surrounding paint.
The idea is not only to remove a decal or pad-printing, but smooth the ridging such that there is little or no ghost of it remaining.
There is no guarantee you won’t take a spot of paint in your enthusiasm or it might be unavoidable, but stripping was your alternative, patch-paint comes out decent since the surface is feathered and smooth.
Your chances of success go up to a very acceptable level with practice, though. Next show you go to, lay in a supply of cheap broken RTR or decal’d HO freightcars. These are actually pearls of great value for practicing letter removal, testing paint methods, and trying weathering techniques.
Cleanup is easy using wire-wool but extremely necessary. A nice thick brush and a magnet are my tools; takes no time. A more overall letter-removal and smoothing job, like smoothing an entire carside with the goal of reshooting an RTR car bought cheap into a different scheme, might do well with a washing up.
Best way to learn this is to get some junk plastic HO and fine wire-wool and have at it. You’ll pick it up pretty quickly.
-
Erik C Lindgren

- Posts: 1307
- Joined: Wed Apr 28, 2010 11:37 pm
- Contact:
Re: What’s on your Workbench?
That's a beaut 86 Trans Am!
-
Erik C Lindgren
- Posts: 1307
- Joined: Wed Apr 28, 2010 11:37 pm
- Contact:
Re: What’s on your Workbench?
John Armstrong stuff. Lucky man. 
-
Erik C Lindgren
- Posts: 1307
- Joined: Wed Apr 28, 2010 11:37 pm
- Contact:
Re: What’s on your Workbench?
I've been tempted to Crack that nut with 3d printing. I'll be looking closely at your experience with it Dan.
Re: What’s on your Workbench?
As we continue with the Valley diesel project:
One of the real weak points of the Weaver plastic FA-2 is how the body is secured to the frame. The little cast-in lugs in the top of the body are annoyingly fragile, easy to split then eventually falling away.
Lots of folks have fixes they like. Mine is very simple, really. I beef them up with collars cut from Evergreen tube-stock.


The ones at the nose take 1/4” while the other four take 7/32”. Unbroken lugs get beefed up nicely. Split lugs are automatic repairs by sleeving using the same method. Broken ones very often leave enough of the lug to glue tube to securely after slipping in a piece of rod drilled and tapped. I make them a little long so those long skinny screws have an easier time finding the hole. inelegant, but effective.
One of the real weak points of the Weaver plastic FA-2 is how the body is secured to the frame. The little cast-in lugs in the top of the body are annoyingly fragile, easy to split then eventually falling away.
Lots of folks have fixes they like. Mine is very simple, really. I beef them up with collars cut from Evergreen tube-stock.
The ones at the nose take 1/4” while the other four take 7/32”. Unbroken lugs get beefed up nicely. Split lugs are automatic repairs by sleeving using the same method. Broken ones very often leave enough of the lug to glue tube to securely after slipping in a piece of rod drilled and tapped. I make them a little long so those long skinny screws have an easier time finding the hole. inelegant, but effective.

Re: What’s on your Workbench?
Although I didn't make it to TCA York show last week, my buddy did. Fifteen minutes after the sales started I received a phone call from him telling me of some O scale brass he spotted. He knows nothing of the subject but if I was there I would have probably walked away with more than just the three he tried to describe. Among them was a PSC piece, a Pacific Limited piece and this Grabowski PRR N5c. All on the cheap. So this is my unexpected workbench project. So far a quick trip to the blasting booth to remove the paint and lettering so some detailing can be done. Added the underbody stuff, straightened out some grabs, a little more to go on that, replaced the broken bolsters with U. S. Hobbies parts and added a new pair of trucks. Today another round in the blasting booth and maybe the primer coat.


Return to “O-Gauge, 2-Rail, Model Railroading”
Who is online
Users browsing this forum: No registered users and 10 guests