Jim, Thank you for continuing to post. I have learned a lot from this thread.
Rob
Bay State DL-109 Restoration Project
-
SWrailroader
- Posts: 127
- Joined: Sat Dec 28, 2024 11:24 am
-
R.K. Maroon

- Posts: 3134
- Joined: Tue Feb 22, 2011 9:20 pm
Re: Bay State DL-109 Restoration Project
I am going to install ball bearings in the journals of the DL-109s in an effort to reduce running friction and thus gear load. I might not be so inclined, but the first unit had gone through at least two axle worm gears before it came to me, so I am hoping that ball bearings will help reduce the friction load on the gears (and thus buy some margin on gear tooth loading). It's a bit of an experiment, but if it doesn't work, I can remove the ball bearings, plug the holes, and re-drill for friction journals.
The sideframes are rigid. There is a way to assemble the truck so that they will equalize when set on the rail. This means that the two sideframes do not have to be perfect aligned to each other as-assembled. Further, if the trucks were two-axle, then alignment of the bearing bores on each sideframe would not be much to worry about either. As it is, the DL-109 has three-axle trucks, so it is very important to line up all three bearings in a straight line. To do that, I have made a support jig as follows:
Step one was to bolt a suitable piece of wood to the mill table:

Step two: drill a shallow hole the exact size of the sideframe-to-bolster mounting hole. Put that size drill in the hole and run the mill table in the x-direction only, adjusting the swing angle of the sideframe until the drill bit in the mill aligns with the second sideframe mounting hole. Drill a hole into the wood at that location:

The idea is to align the sideframe so that the bearing bores, once milled, are on the same alignment as the mounting holes.
Step three: Mark the wood in the places where relief is needed for the journal boxes, springs, and brake cylinders:

Step four: Mill these pockets out:

When done, the sideframe will sit flush to the wood:

The holes for the drill bits were made shallow to leave material for hold-down screws to bite. If I have been sufficiently careful, and if the original journals were similarly located, then the existing journal holes should be aligned with the x-axis of the mill. I will report back.
Jim
The sideframes are rigid. There is a way to assemble the truck so that they will equalize when set on the rail. This means that the two sideframes do not have to be perfect aligned to each other as-assembled. Further, if the trucks were two-axle, then alignment of the bearing bores on each sideframe would not be much to worry about either. As it is, the DL-109 has three-axle trucks, so it is very important to line up all three bearings in a straight line. To do that, I have made a support jig as follows:
Step one was to bolt a suitable piece of wood to the mill table:
Step two: drill a shallow hole the exact size of the sideframe-to-bolster mounting hole. Put that size drill in the hole and run the mill table in the x-direction only, adjusting the swing angle of the sideframe until the drill bit in the mill aligns with the second sideframe mounting hole. Drill a hole into the wood at that location:
The idea is to align the sideframe so that the bearing bores, once milled, are on the same alignment as the mounting holes.
Step three: Mark the wood in the places where relief is needed for the journal boxes, springs, and brake cylinders:
Step four: Mill these pockets out:
When done, the sideframe will sit flush to the wood:
The holes for the drill bits were made shallow to leave material for hold-down screws to bite. If I have been sufficiently careful, and if the original journals were similarly located, then the existing journal holes should be aligned with the x-axis of the mill. I will report back.
Jim
The link below any photo will display the image full size
Re: Bay State DL-109 Restoration Project
That is some great work and lots of thought and common sense went into your jig. You make it look easy, but like so many jobs you need to think it through to eliminates as many gothcas as you can before the work commenced. I've done very few jobs (so far) with the drill press Bob told me about, but stabilizing the material seems to be just about the most important consideration......your jig does that in aces.
-
R.K. Maroon
- Posts: 3134
- Joined: Tue Feb 22, 2011 9:20 pm
Re: Bay State DL-109 Restoration Project
The main purpose of the jig discussed in my last post was to provide a solid base to hold the sideframes while boring out the journals for ball bearings. As a bonus, I was hoping by carefully aligning it on the mill table that the existing journal holes would line up with the x-axis of the mill. This would allow me to bore the new holes in a straight line by just moving the x-axis table. I was please to report that this worked, at least on the first sideframe, as this composite image shows:

So I was thinking I had smooth sailing from this point: Just insert my new pilot counterbore into the mill and cut metal. To my surprise, the bronze sideframe proved to be a worthy opponent to the high-speed steel counterbore. I was able to get the holes bored, but it was slow go. Here is another composite photo, showing the holes as bored on top and with the bearings inserted below:

I have twenty-one more holes to bore. I'm going to acquire a carbide end-mill to (hopefully) speed things up.
For those not familiar with a pilot counterbore, it's a nifty device that picks up the existing hole, ensuring concentricity with the counter bore. Here is a generic photo:

The item I have has a sliding pilot. That is convenient for this application, as I can let the pilot drop all the way to the bottom of the existing journal hole (as that gives best alignment) and then cut the counterbore without having to remove or shorten the pilot.
So I was thinking I had smooth sailing from this point: Just insert my new pilot counterbore into the mill and cut metal. To my surprise, the bronze sideframe proved to be a worthy opponent to the high-speed steel counterbore. I was able to get the holes bored, but it was slow go. Here is another composite photo, showing the holes as bored on top and with the bearings inserted below:
I have twenty-one more holes to bore. I'm going to acquire a carbide end-mill to (hopefully) speed things up.
For those not familiar with a pilot counterbore, it's a nifty device that picks up the existing hole, ensuring concentricity with the counter bore. Here is a generic photo:
The item I have has a sliding pilot. That is convenient for this application, as I can let the pilot drop all the way to the bottom of the existing journal hole (as that gives best alignment) and then cut the counterbore without having to remove or shorten the pilot.
The link below any photo will display the image full size
Re: Bay State DL-109 Restoration Project
Interesting tool/bit that I never knew existed, but certainly makes a lot of sense for this task.
-
R.K. Maroon
- Posts: 3134
- Joined: Tue Feb 22, 2011 9:20 pm
Re: Bay State DL-109 Restoration Project
A question came in regarding the source for the pilot counterbore. I bought mine from drillsandcutters.com. It is listed as a pilot hole counterbore, I guess to differentiate it from a counterbore with a fixed pilot. Here is the photo from the listing:

The pilot shaft is not shown in the photo, which I am guessing is generic. Also not shown is the set screw in the shank that can be used to fix the pilot if desired. The particular tool I bought is at the link below:
https://drillsandcutters.com/3-16-x-3-32-pilot-hole-hss-straight-shank-counterbore/
I did a little research into machining bronze. It turns out that there are several common grades of bronze, one of which (aluminum bronze) is very hard. This bronze is tricky to mill and very abrasive. A coated carbide end mill is recommended. I will acquire one and give that a try. As an aside, the notion that some bronzes are very abrasive jives with this situation (posted many years ago) in which a steel axle is found worn down by the bronze bearing it rode in:

The things one learns when fooling with doorstops...
The pilot shaft is not shown in the photo, which I am guessing is generic. Also not shown is the set screw in the shank that can be used to fix the pilot if desired. The particular tool I bought is at the link below:
https://drillsandcutters.com/3-16-x-3-32-pilot-hole-hss-straight-shank-counterbore/
I did a little research into machining bronze. It turns out that there are several common grades of bronze, one of which (aluminum bronze) is very hard. This bronze is tricky to mill and very abrasive. A coated carbide end mill is recommended. I will acquire one and give that a try. As an aside, the notion that some bronzes are very abrasive jives with this situation (posted many years ago) in which a steel axle is found worn down by the bronze bearing it rode in:
The things one learns when fooling with doorstops...
The link below any photo will display the image full size
-
bob turner
- Posts: 13616
- Joined: Sat Jan 13, 2007 7:57 pm
Re: Bay State DL-109 Restoration Project
I have seen steel worn down in good porous bronze bearings. We routinely replaced both bearings and axles on the club MTH Diesels. Funny thing - the bronze bearings were the same size as the control hinge bearings on a Piper Cub.
Re: Bay State DL-109 Restoration Project
I've seen bronze bearing but had no idea they were so hard. Obvioulsy bronze swords and weapons from the Bronze age were a lot tougher than I ever knew or gave them credit for.
-
R.K. Maroon
- Posts: 3134
- Joined: Tue Feb 22, 2011 9:20 pm
Re: Bay State DL-109 Restoration Project
up148 wrote:I've seen bronze bearing but had no idea they were so hard
I did some research on this and discovered, no surprise, that there are many different bronze alloys. Four common ones are:
-- Phosphor Bronze, which when cold rolled or drawn makes very stiff spring material with good fatigue resistance. Many or most of us are, I imagine, familiar with the use of phosphor bronze in model railroading for wheel pickups and trolley wire.
-- Aluminum Bronze, which is used commonly in castings. It can be used for bearings because of its wear resistance, but it must be kept lubricated, as the steel axle in the photo above indicates.
-- Silicon Bronze, which is easy to machine and form while also corrosion resistant, often used in architectural ornamentation and other applications where strength is not critical.
-- Leaded Bronze, often called Bearing Bronze. The addition of lead to the alloy makes this alloy less abrasive than aluminum bronze.
There is a bit of easy confusion here, as leaded bronze is described as having self-lubricating qualities. However, self-lubricating bronze is a different animal, as it has graphite impregnated within it.
As it is, all the bronze axle bearings found in my old doorstops are not bronze bearing inserts, but simply bored out castings, like these Sieber Bros drives for the Adams and Son E-unit casting set:

It's easy to conclude that things would have been better with these if they just made the bearing area wider, but these were among the first diesel models ever offered, so they were learning as they went. But learn they did. Here is a later version:

I have been away for a week, so no progress to report on the DL-109 project. Back to it this week. I have a supply of carbide bits due to arrive tomorrow. Work on the sideframes will hopefully speed up with these in hand (or, should I say, in collet).
Jim
The link below any photo will display the image full size
-
Dennis Holler
- Posts: 472
- Joined: Mon Dec 13, 2010 8:31 pm
Re: Bay State DL-109 Restoration Project
I have two of these, I got one from Carey and the New Haven came from the Bay.

Looks like the New Haven has the same frame as well. I plan to add the second motor like yours as well.


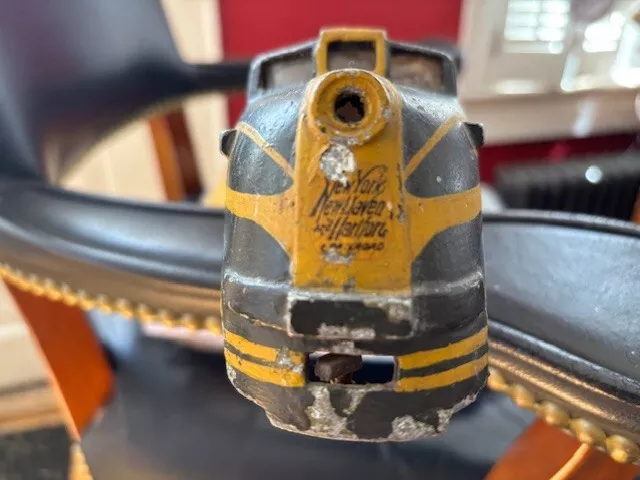
I need to make two center bolsters for the Primer unit. Jim, you sent me the missing side grills a while back and I thank you for that! It is nice to know that the New Haven unit is mostly original but will need the same work you are doing. I appreciate all the photos of installing the gears and sprockets. I'll need to find a bunch of sprockets as well.
Looks like the New Haven has the same frame as well. I plan to add the second motor like yours as well.
I need to make two center bolsters for the Primer unit. Jim, you sent me the missing side grills a while back and I thank you for that! It is nice to know that the New Haven unit is mostly original but will need the same work you are doing. I appreciate all the photos of installing the gears and sprockets. I'll need to find a bunch of sprockets as well.
Doorstop Rookie
-
SWrailroader
- Posts: 127
- Joined: Sat Dec 28, 2024 11:24 am
Re: Bay State DL-109 Restoration Project
Jim,
Thank you for the discussion on the different types of bronzes. It is refreshing to finally see some science in the forum when so much of the technical discussions are more empirical.
Rob
Thank you for the discussion on the different types of bronzes. It is refreshing to finally see some science in the forum when so much of the technical discussions are more empirical.
Rob
-
R.K. Maroon
- Posts: 3134
- Joined: Tue Feb 22, 2011 9:20 pm
Re: Bay State DL-109 Restoration Project
Nice to see that more of these models have surfaced. Dennis, does that single-motor unit run?
The carbide-tipped bits have arrived:

I ordered these to bore the sideframes for ball bearings. I did not buy the cheap Chinese bits that are available, but spent the extra dollars to get US-made bits, on the presumption that quality matters with cutting tools (which has certainly been my experience with drill bits). Per recommendations from several online references, I bought TiAIN coated bits. I was hopeful, but never expected that they would cut the bronze like it was butter:

I could not feel the bit loading up, and could barely hear it cutting. It took less than ten seconds to bore to depth. VERY PLEASED
Alas, I later paid for my joy with a hard lesson. On the third and last hole for this sideframe, I brought the stationary tool down to the sideframe to check alignment before cutting. Without thinking, I let the tool touch the sideframe without it turning, which loaded it with the weight of the mill machine head. To my horror, a chip came off flying off one of the teeth. Oh yea, carbide is brittle. DANG -- OK, LESSON LEARNED.
Glad I bought more than one.
Jim
The carbide-tipped bits have arrived:
I ordered these to bore the sideframes for ball bearings. I did not buy the cheap Chinese bits that are available, but spent the extra dollars to get US-made bits, on the presumption that quality matters with cutting tools (which has certainly been my experience with drill bits). Per recommendations from several online references, I bought TiAIN coated bits. I was hopeful, but never expected that they would cut the bronze like it was butter:
I could not feel the bit loading up, and could barely hear it cutting. It took less than ten seconds to bore to depth. VERY PLEASED
Alas, I later paid for my joy with a hard lesson. On the third and last hole for this sideframe, I brought the stationary tool down to the sideframe to check alignment before cutting. Without thinking, I let the tool touch the sideframe without it turning, which loaded it with the weight of the mill machine head. To my horror, a chip came off flying off one of the teeth. Oh yea, carbide is brittle. DANG -- OK, LESSON LEARNED.
Glad I bought more than one.
Jim
The link below any photo will display the image full size
-
SWrailroader
- Posts: 127
- Joined: Sat Dec 28, 2024 11:24 am
Re: Bay State DL-109 Restoration Project
Jim,
Thanks for posting. With ball bearings this loco should have phenomenal running qualities.
Rob
Thanks for posting. With ball bearings this loco should have phenomenal running qualities.
Rob
-
Dennis Holler
- Posts: 472
- Joined: Mon Dec 13, 2010 8:31 pm
Re: Bay State DL-109 Restoration Project
Jim, all your posts will help me as well,, so thank you very much!!
Doorstop Rookie
Return to “O-Gauge, 2-Rail, Model Railroading”
Who is online
Users browsing this forum: No registered users and 284 guests