yeah - lead is bad enough.
I always used propane with a pencil tip, but started using Mapp - hotter flame, therefore quicker process.
I have the PA screwed back together with proper truck support rails, and have only to fill the holes in the side and mount the fuel tank shrouds before applying my jig and solder. This one really doesn't need the jig, since it is completely held with 1-72 screws. But I will apply the jig for photos.
The previous owner was good at what he/she did - alignment is almost perfect. The unit was coated with something impervious to paint stripper and propane heat. Even oxy-acetylene would not loosen the paint. But it popped right off in the bead blast cabinet.
More in a week or so.
Alco PA and FA 2023
-
Pacific Limited
- Posts: 472
- Joined: Sat Jan 22, 2011 10:46 pm
- Contact:
-
bob turner
- Posts: 13430
- Joined: Sat Jan 13, 2007 7:57 pm
Re: Alco PA and FA 2023
It was supposed to rain and blow all afternoon (as usual, predictions in San Diego don't always pan out) so I chickened out and stayed home.
I should be cleaning up, but instead I fixed a gearbox, started a new dome for the Erie Berk, and began the final soldering of my latest sand cast PA.
I have one photo so far, and in a few minutes will bolt the side/roof jig on and take another. There will be a lot of words to go along with these photos.
-
bob turner
- Posts: 13430
- Joined: Sat Jan 13, 2007 7:57 pm
Re: Alco PA and FA 2023
Here we go - I will add text later via edit:
Edit: I decided to solder the bolster supports and fuel tanks first - you can see the result. Both are held by 2-56 brass screws, heated with a torch on the firebrick, and done. I am using Oatey's H2O flux - something I used a long time ago with good results. This new can may be different, but it works.
Previous owner had cut off the fuel tank attach bosses, hence the sheet metal and clamp.
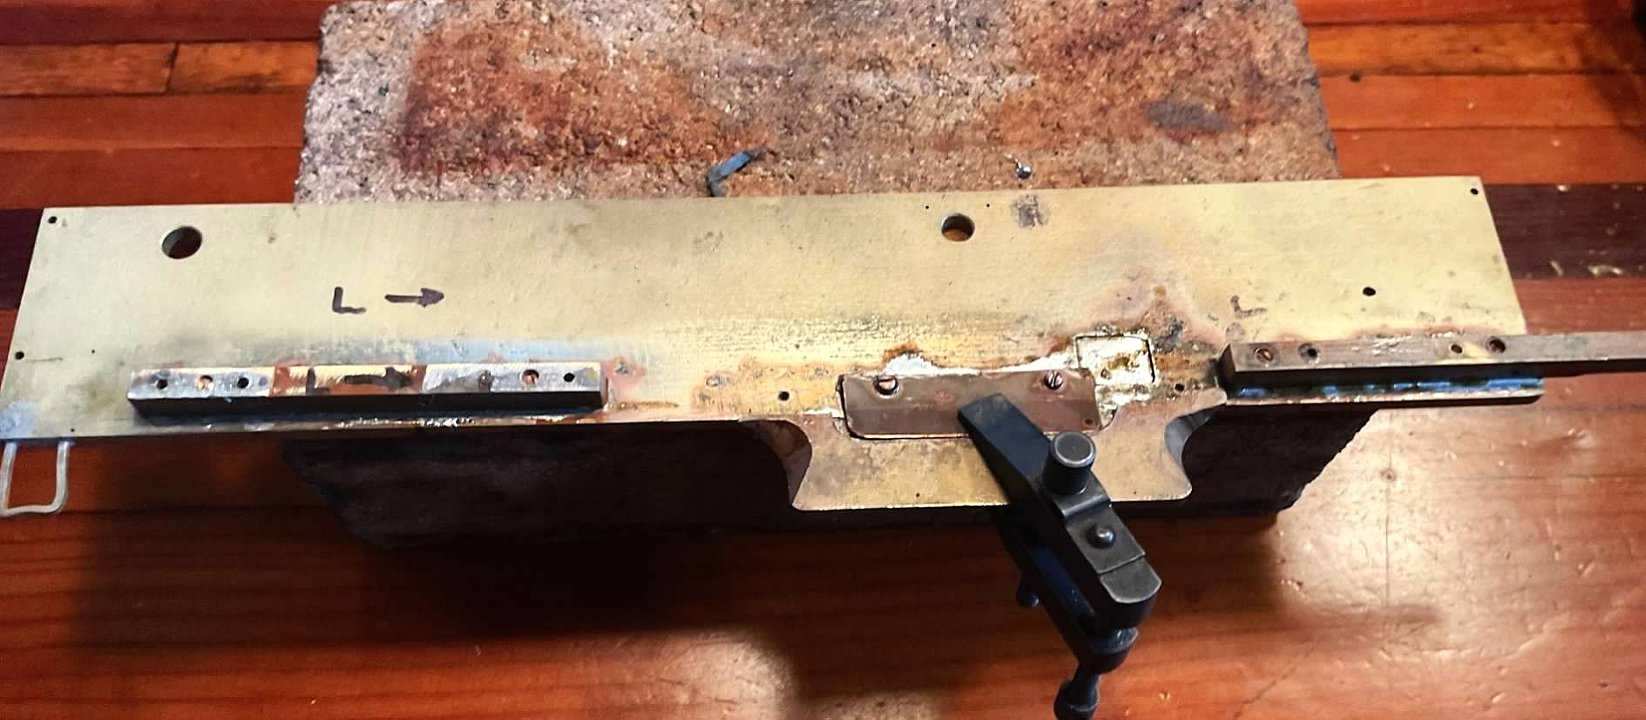
This photo shows the spreader, attached through the door windows with little machined buttons to fit the windows. The screw you see going vertically is tapped into the roof, and tightened by that little square thing you see on the screw. This little deal guarantees that the sides and roof mate fairly closely. In this case, the roof does not need to be pulled down, but the sides had to come in about a 32nd.
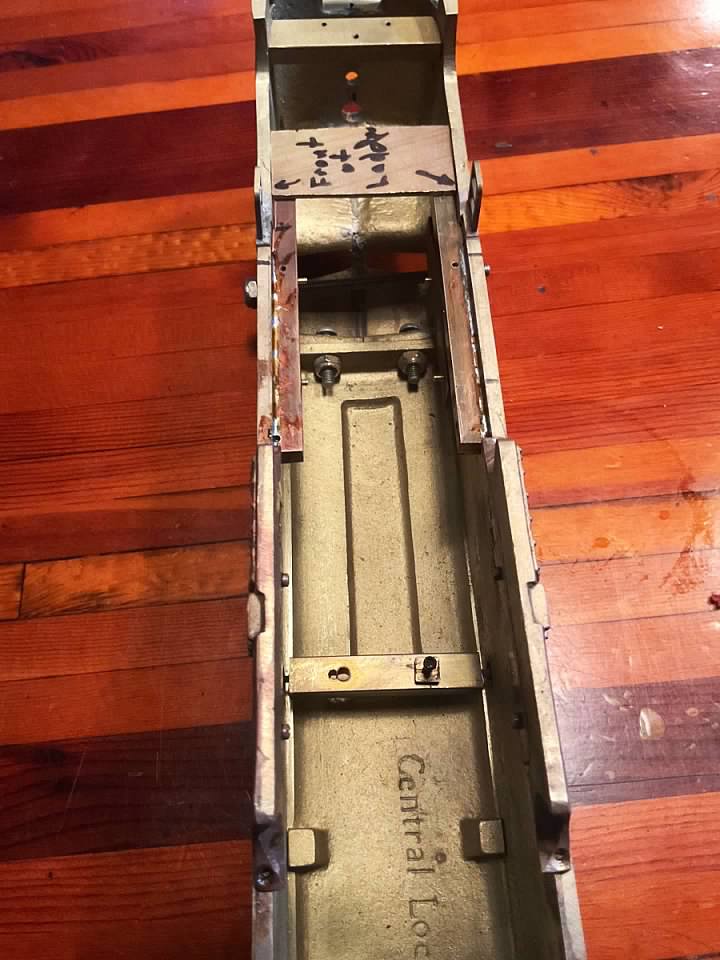
Finally, the nose was already soldered, so just for insurance I clamped it through the cab door windows with that giant 1/4-20 stud. Turns out that the propane torch will only get a very local area hot enough to melt 60-40 solder, so I am really not in much danger of the nose coming apart.
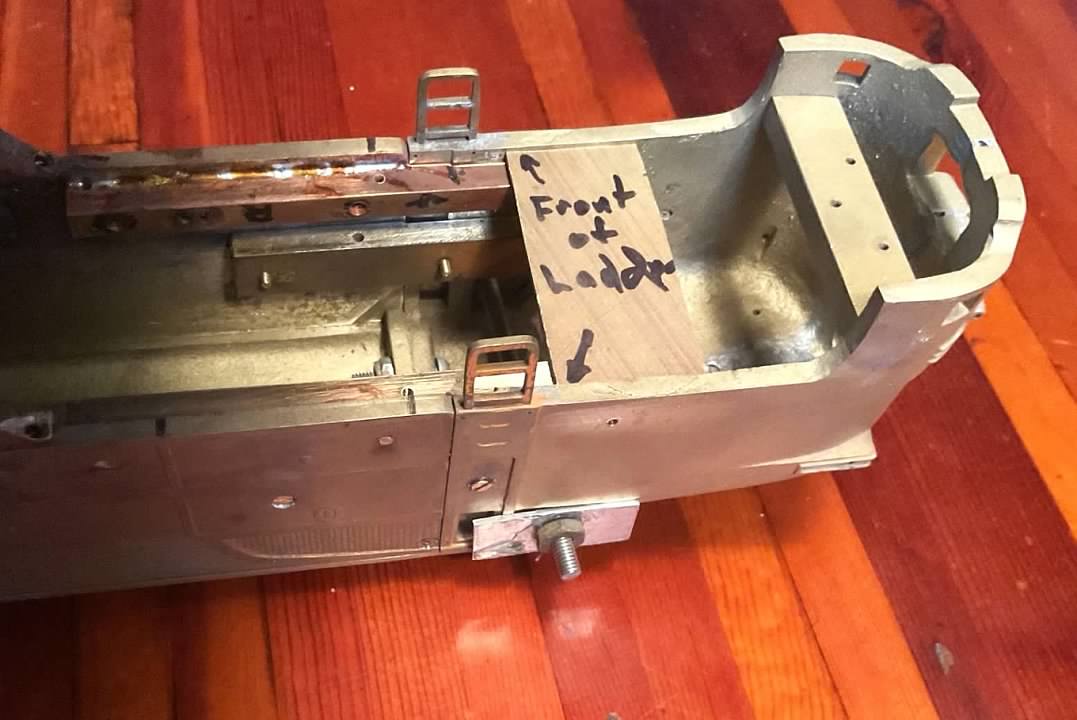
You may be able to see how I hold the nose on - there are those giant bolts holding the roof, but also the front truck bolster rails are screwed and soldered. For this unit, the nose fit so well that the extra brass in there is probably not necessary. You can bet I will be careful adding heat - I don't want those ladders falling off (they probably will anyway). Plan is to flux and solder tomorrow before I go to the airport.
Edit: Sunny in San Diego, but I soldered the thing together with the last dregs of propane - went just fine. The ladders are sunk into holes in the sides - one rung slipped slightly. Easy fix.
Propane and MAP gas, with a pencil tip,. gives a fairly soft flame, thus no carbon deposits on the places where the flame is played. It takes about five minutes with a steady hand to start the flow, but once it is going you have about a one inch place where the metal is hot enough for the solder to flow, and you move that place with the torch. I recommend gloves, but I did this one without, by extending a board out so I could get to both sides without touching the carbody.
Open to questions if any of you are thinking about such a project. There are still a lot of raw castings out there, and prices are going through the roof.
As Maroon would say - What Fun!
Edit: I decided to solder the bolster supports and fuel tanks first - you can see the result. Both are held by 2-56 brass screws, heated with a torch on the firebrick, and done. I am using Oatey's H2O flux - something I used a long time ago with good results. This new can may be different, but it works.
Previous owner had cut off the fuel tank attach bosses, hence the sheet metal and clamp.
This photo shows the spreader, attached through the door windows with little machined buttons to fit the windows. The screw you see going vertically is tapped into the roof, and tightened by that little square thing you see on the screw. This little deal guarantees that the sides and roof mate fairly closely. In this case, the roof does not need to be pulled down, but the sides had to come in about a 32nd.
Finally, the nose was already soldered, so just for insurance I clamped it through the cab door windows with that giant 1/4-20 stud. Turns out that the propane torch will only get a very local area hot enough to melt 60-40 solder, so I am really not in much danger of the nose coming apart.
You may be able to see how I hold the nose on - there are those giant bolts holding the roof, but also the front truck bolster rails are screwed and soldered. For this unit, the nose fit so well that the extra brass in there is probably not necessary. You can bet I will be careful adding heat - I don't want those ladders falling off (they probably will anyway). Plan is to flux and solder tomorrow before I go to the airport.
Edit: Sunny in San Diego, but I soldered the thing together with the last dregs of propane - went just fine. The ladders are sunk into holes in the sides - one rung slipped slightly. Easy fix.
Propane and MAP gas, with a pencil tip,. gives a fairly soft flame, thus no carbon deposits on the places where the flame is played. It takes about five minutes with a steady hand to start the flow, but once it is going you have about a one inch place where the metal is hot enough for the solder to flow, and you move that place with the torch. I recommend gloves, but I did this one without, by extending a board out so I could get to both sides without touching the carbody.
Open to questions if any of you are thinking about such a project. There are still a lot of raw castings out there, and prices are going through the roof.
As Maroon would say - What Fun!
Last edited by bob turner on Tue Feb 17, 2026 2:10 pm, edited 1 time in total.
-
Rufus T. Firefly

- Posts: 41907
- Joined: Wed May 16, 2007 7:52 am
- Location: To be Determined
Re: Alco PA and FA 2023
Thanks, Bob. I was wondering about those ladders, too.
Just remember: what horses consider play, monkeys consider business, but to Tom it’s all foolery.
Re: Alco PA and FA 2023
Great photos Bob, are you using camera or phone. I'm always amazed at the thickness of the castings on these early models. It would take a lot of hear to melt solder and yet I see little or no signs of metal over temping.
-
bob turner
- Posts: 13430
- Joined: Sat Jan 13, 2007 7:57 pm
Re: Alco PA and FA 2023
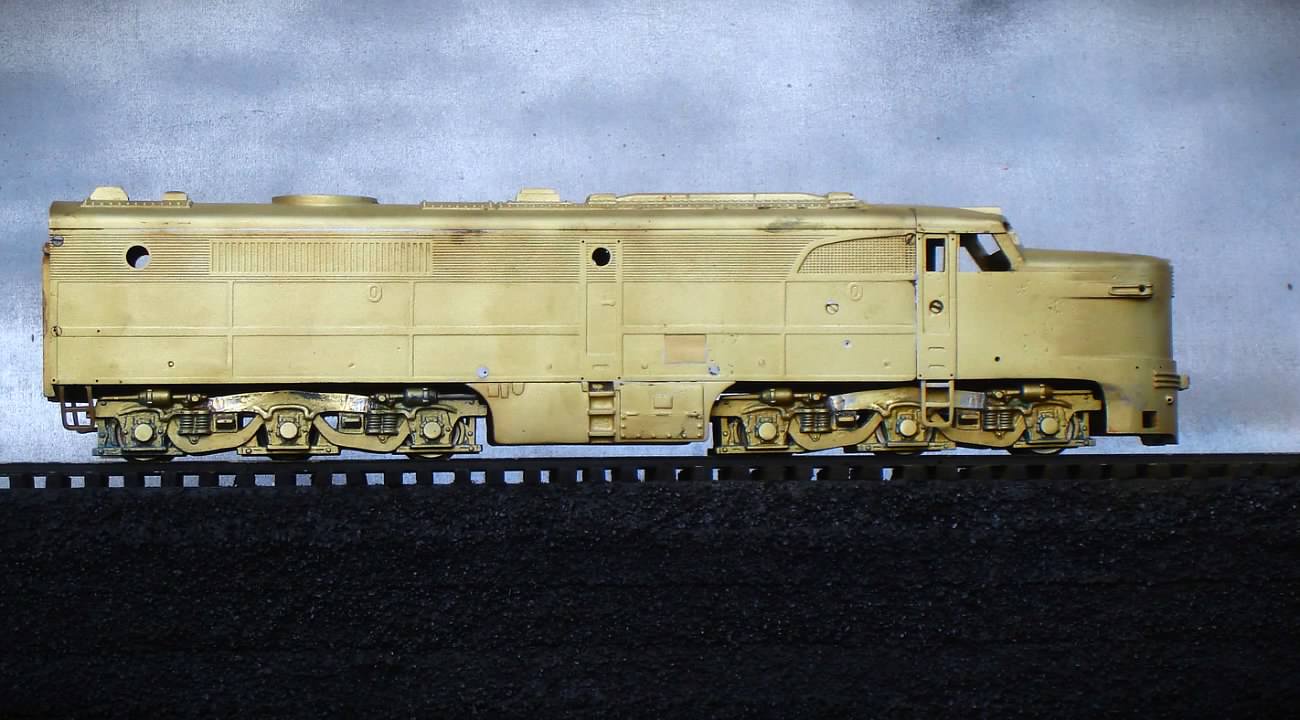
I use about half camera and half iPad. Those are iPad photos, and this one is camera -
This is the more or less finished PA - it needs a lot of sanding and some filler, and I am thinking about getting some Molotow liquid and hitting it with that for another Warbonnet attempt:
PS - if interested in my Erie Berk, I have added a shot to the collection on the last post of page one. Sand Dome is coming along . . .
Re: Alco PA and FA 2023
Bob, magnificent beast!
Dan Weinhold
Dan Weinhold
Re: Alco PA and FA 2023
PS - if interested in my Erie Berk, I have added a shot to the collection on the last post of page one. Sand Dome is coming along . . .
I agree the dome could be a little taller, but the shape seems to be closer to the prototype. Nice installation!
-
Dennis Holler
- Posts: 455
- Joined: Mon Dec 13, 2010 8:31 pm
Re: Alco PA and FA 2023
This is great Bob! Thank you very much for the deescription and pictures. This helps a great deal. Now I just have to get off my lazy behind and set mine up and go at it.
Doorstop Rookie
-
SWrailroader
- Posts: 72
- Joined: Sat Dec 28, 2024 11:24 am
Re: Alco PA and FA 2023
Nifty but I kind of liked it more in the GE Orange demonstrator livery. I still have the another A unit and a B unit from the original builder. I am envious of your skills. Also envious that you can go to work anytime in you hangar or garage given the lovely weather in SD.
-
Dennis Holler
- Posts: 455
- Joined: Mon Dec 13, 2010 8:31 pm
Re: Alco PA and FA 2023
I must admit, I have yet to get around to soldering my PA together, but I can report I managed to find a PB to go with it. It seems to have been soldered together already, hard to say how well I guess. It also seems to have 6 CLW plastic gearboxes in it and can for juice. We will see when it shows up. Maybe that will spark me to attempt to solder the PA together!


and the PA for reference.

I am happy to find a B with the early cast sides to match my A unit... Now just have to do something with them!
and the PA for reference.
I am happy to find a B with the early cast sides to match my A unit... Now just have to do something with them!
Doorstop Rookie
-
bob turner
- Posts: 13430
- Joined: Sat Jan 13, 2007 7:57 pm
Re: Alco PA and FA 2023
Heat that B up, disassemble (it should just fall apart), clean up the parts, jig for a roofline at least as good as your PA, then heat and resolder. You will be amazed at how easy all that is, and pleased with the results.
-
Dennis Holler
- Posts: 455
- Joined: Mon Dec 13, 2010 8:31 pm
Re: Alco PA and FA 2023
That's for all the support Bob. It's finally warm enough up here I can get out in the garage for a bit and fool around.
BTW, I managed to snag a Pomona E unit with the Siebers sides so will need to build that one as well. It came with the chassis and gearbox but not the geardrives for the trucks.

So definitely need to get that torch out and do some work.
BTW, I managed to snag a Pomona E unit with the Siebers sides so will need to build that one as well. It came with the chassis and gearbox but not the geardrives for the trucks.
So definitely need to get that torch out and do some work.
Doorstop Rookie
-
bob turner
- Posts: 13430
- Joined: Sat Jan 13, 2007 7:57 pm
Re: Alco PA and FA 2023
Always remember - keep the torch flame on the casting, never the sheet metal. These are tough to do unless you are happy with sides without any details, like rivet strips and window frames. If you are happy with that, then just screw the sides on, and fill the screw heads with putty.
Return to “O-Gauge, 2-Rail, Model Railroading”
Who is online
Users browsing this forum: No registered users and 29 guests